
What does “Non-Newtonian” really mean when it comes to bowling lane conditioners?
So, you know that non-Newtonian liquids are just like ketchup; you have to apply some force to make the liquid flow. But, what does “non-Newtonian” really mean?
You’ve likely heard of the English mathematician and physicist, Sir Isaac Newton. He is, after all, one of the most influential scientists of all time. He formulated the laws of motion and universal gravitation, laid the foundations of classical mechanics, and had a hand in developing calculus. He even did a lot of work in optics and built the first practical reflecting telescope!
Newton developed several scientific laws that described the relationship between forces, bodies, motion, and responses. You probably studied his three laws of motion in high school physics. You may have even studied Newton’s law of viscosity in school; though you may not have realized it!
Newton’s law of viscosity isn’t a fundamental law of nature (like the laws of motion or gravity). Rather, it is a relationship between two physical quantities; in this case, viscosity and force (called shear). When viscosity doesn’t change no matter how much force is applied; i.e. when viscosity is independent of shear; you have a Newtonian fluid. Most fluids are Newtonian and the most common one is water. Under normal conditions, the viscosity of water doesn’t change no matter how much force; or shear; is applied.
There are different kinds of non-Newtonian fluids; shear-thinning and shear-thickening are two of the more common kinds. The viscosity of these fluids will change depending on the amount of force that is applied. A shear-thinning fluid will experience a decrease in viscosity with more applied force while a shear-thickening fluid will experience an increase in viscosity with more applied force.
Ketchup is the perfect example of a non-Newtonian, shear-thinning fluid. You can turn the bottle upside down and wait for the ketchup to flow and it just never seems to happen. Give the bottle a couple of solid taps on the palm of your hand though, and the ketchup starts to ooze out of the bottle. The force applied to the bottle caused the viscosity of the ketchup to decrease (the ketchup became thinner) enough so that the ketchup would flow from the bottle. Once a force is no longer being applied; i.e. the ketchup is on the plate; the ketchup returns to its original viscosity and sits in a blob on the plate.
All that is cool, but how does this relate to lane conditioners?
Well, with a non-Newtonian conditioner, each bowler will see slight variations in ball motion. For example, a high-rev, high-speed player; here’s looking at you, cranker; will apply a lot of force to the conditioner. As such, the shear applied to the conditioner will cause the viscosity of the conditioner to decrease. This will allow the player to see a little more push; the ball will skid where it needs to skid. A low-rev, low-speed player; that’s all you strokers out there; will apply a lot less force to the conditioner. The shear applied to the conditioner won’t cause as much of a decrease in viscosity as the cranker saw. As such, the stroker will see a little more friction so the ball will read and pick-up where it needs to pick-up. In simpler terms, the stroker will see “good friction” while the cranker will see a little more slickness.
Of course, this is all on a very small scale. A 200 rev rate bowler might “see” the viscosity as 70 cps while a 500 rev rate bowler might “see” the viscosity as 65 cps. In the scheme of viscosity, 5 cps is very small. So, what the ball; and the bowler; see is very subtle. But, it’s just enough to help all bowlers find good ball reaction.
Learn more about Kegel’s non-Newtonian Lane Conditioner, Terrain.

The Use of Poseable Mannequins During Bowling Motor Skill Training
Originally published in Bowling This Month
All athletes go through several stages during the process of motor skills training.
During the first stage, the athlete must be given all the information needed to form an image of the movement being practiced in his or her mind.
The next stage is when the athlete starts to master the new movement. This stage is characterized by the conscious control of all actions, slow movements, a significant amount of errors, and being easily distracted by external or internal stimuli.
The final stage of skill mastery is evident when the athlete starts performing movements automatically, without conscious control, using an optimal rate of movement, with an error rate that is trending to zero, and has a stable resistance to external or internal distractions.
Forming the image of the skill in the mind
The role of the first stage of mastering a skill is often underestimated. It is critical that the information be delivered in a way that is accessible and understandable to the student so that they can form the correct image of movement within their mind. In my observations, sometimes 15 minutes effectively spent at this stage can save dozens of hours of training in the later stages of mastering a skill.
This important first stage will be discussed in this article, and I will include my experience with optimizing this process. Future articles will cover the next two stages.
Methods of image formation
As a coach, one must use all possible channels of education to help the athlete create the correct execution of the skill within their minds. The visual, auditory, and kinesthetic learning modalities should be used effectively as needed for each student. In general, the effectiveness of training will increase significantly when a combination of these modalities is utilized.
In fact, the uptake rate and quality of understanding increase dramatically when combining all three perception channels. Research has shown that when using just auditory or visual channels separately, only 10% of new information is absorbed. The combination of audio and video helps to increase the uptake level to 50%. Adding the kinesthetic channel to the other two provides an optimal rate of 90% of new information being understood. Thus, the integrated approach of using all three learning modalities is the most efficient. Of course, the coach needs to recognize and take advantage of the athlete’s dominant channel of perception.
During the initial stage of skill training, it is necessary to create a complete field of information for a given skill set.
During the later stages of skill encoding, the most efficient implementation is to work with the channel of perception which “delivers” information in the form closest to the type and kind of thinking directly involved in the learning process and the implementation of a given skill. For example, when mastering a skill that predominantly uses spatial and visual thinking, it is usually most efficient to use the visual channel as the dominant one and the others as complementary. Or, if the proprioceptive senses are mostly involved, it is recommended to use the kinesthetic channel of perception as the dominant one and the other channels as complementary.
The critical role of spatial and visual thinking in bowling skill-building
Spatial thinking is an activity that helps the athlete create mental images which they can adapt to solve practical and theoretical problems. Following this definition, we understand that it is this kind of thinking that is dominant when we are teaching and training different skills in bowling. A well-developed sense of spatial thinking will greatly enhance the bowler’s ability to learn and understand many physical and analytical skills related to bowling.
In the bowling alley, where in addition to a good technical throw, the player is required to understand motion phase analysis of the ball along it’s path (skid, hook, and roll), changes in the oil pattern, types of pin action, and much more. In virtually all stages of the training process, spatial and visual thinking modalities are absolutely essential tools for a player’s success. Equally important is the development and the effective use of these kinds of learning modalities for the coach’s success in training their athletes.
Spatial and visual thinking in forming motor imagery
Spatial and visual thinking allows a player to simultaneously work on understanding technical elements of the physical game as well as forming motor imagery in the player’s mind (i.e. it can be used as the first stage of motor skill formation). Some elements of this technique are similar to the motor imagery practice, but it is simpler to use and does not require special training.
We must simplify the process of mentally visualizing a technique to the point that the player can easily press “play” in their mind in order to see the technique played out. The creation of a mental image of a practiced movement is a prerequisite for its further improvement. The rate of a player’s improvement depends largely on the degree of detail and accuracy given to this mental imagery. Plus, fine motor skills will be used to develop such thinking skills as reaction time, attention, coordination, imagination, observation, and visual and motor memory.
For using this training method, three things are needed: a video of a student’s shot, a video of an equivalent master’s shot (i.e. a bowler with similar physical and mental traits to the student), and a 12 inch tall mannequin, such as one used by art students and sold in stores like IKEA, Hobby Lobby, Michael’s, etc. Examples of the type of mannequins which are effective for this type of training are shown below.
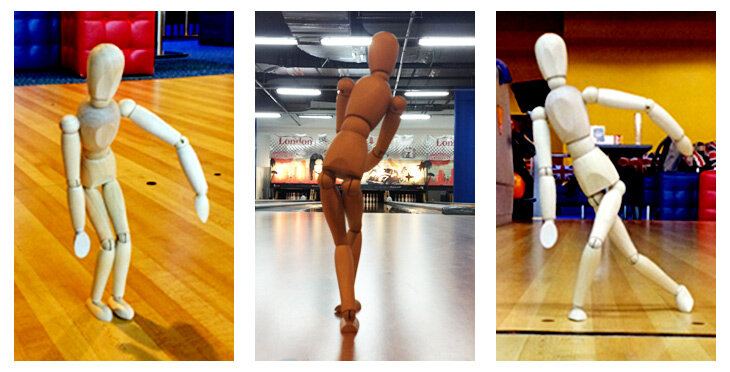
A small artist’s mannequin can be used to demonstrate physical poses during training.
The coach and the student view the video of the student’s shot and discuss the technical elements which are to be worked on.
The coach and the student view the video of the equivalent master shot and, once again, discuss the technical elements.
Using the mannequin, create images of the necessary technical elements.
Set the mannequin in the approach area of a lane or on the layout of a bowling lane for a more complete and correct understanding of the player’s position in the space.
At the end of the process, ask the student to mentally reproduce all the movements in sequence.
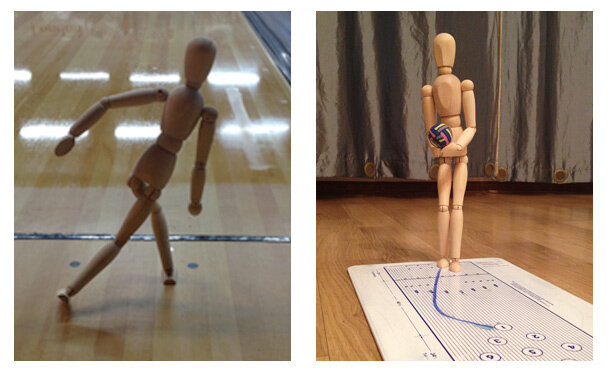
The mannequin can be used both on-lane and on top of a bowling lane overlay, such as the clipboard overlay shown.
After a while, your students will be able to easily adjust the image of the necessary technical elements in full, and “play” it at will in their imagination. This method is especially effective for young players.
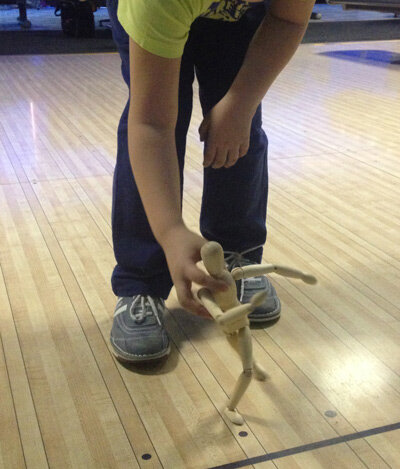
Use of the mannequin during training sessions involving young bowlers is especially effective.
Often, this method of training is not only useful, but it is also is a lot of fun. Give it a try in your own coaching sessions and see for yourself!
Jedi Bowling: Line-of-sight construction skill and the methods of its training
Originally published in Bowling This Month
“Skill” is the ability to carry out an action automatically without active conscious control. An indicator of skill competence is performance of an action without the need to consciously think about how the action will be performed. When a person has skill competence for a given task, it is no longer necessary to think about the execution of the skill via its separate partial sub-operations.
Successful bowling, of course, requires competence in countless complex skills. One of the many jobs of the bowling coach is to develop and use the most effective methods of skill training on our students so that their learning processes can be accelerated as much as possible.
In this article, I want to analyze the process of learning and the implementation of one specific bowling game skill. Namely, we will examine the line-of-sight construction skill of the bowler. Line-of-sight construction is a skill that allows the bowler to envision the launch trajectory of the bowling ball on the lane. We’ll start with some background and with a description of why this skill (as well as other similar skills) can be so challenging to teach. Finally, we will give an example of a new method of line-of-sight training that I’ve been using successfully with my own students to accelerate their development.
Background and motivations
Throughout my career as a bowling coach, I’ve had the opportunity to work with a wide variety of bowlers. This includes players at the novice level all the way up to the national team level.
Additionally, I have a significant amount of experience coaching deaf bowlers. One of my students is a medalist in the Deaflympics and numerous of my other deaf students are European Bowling Championship winners. Recently, one of my female deaf students won a Gold medal at the 3rd World Deaf Bowling Championships in Bologna, Italy in August 2015.
Working with bowlers who have different types of thinking skills has motivated me to seek out improved teaching methodologies for our sport. The task of building an efficient training process for deaf bowlers, for example, has been very non-trivial. This led me to deeply analyze the process of bowling skill learning from the perspectives of cognitive and educational psychology.
This process uncovered psychological regularities of the bowling training process. Developing an understanding of these regularities has resulted in me adjusting my training methods for improved efficiency. This has led to significant accelerations in skill mastery for players of all types.
Line-of-sight construction is one particular bowling skill that can be challenging to teach to both deaf bowlers and many non-deaf bowlers alike. Let’s start by taking a close look at this skill and the current methods of its teaching.
Line-of-sight construction: one of bowling’s fundamental skills
Bowling is a complex skill that involves perceptual, intellectual, and motor abilities of the player. In these ways, it is quite similar to other complex skills, such as learning to control an aircraft, for example. The ability to:
construct motion paths,
control physical efforts,
feel position in space,
make quick decisions about the current situation,
perform standard operations, and
know and apply correctly a set of rules
All are features of both bowling and controlling an aircraft. Many complex activities in a wide variety of disciplines share these same characteristics.
In bowling, line-of-sight construction is an important skill related to targeting that must be developed by bowlers of all levels. This skill is chosen as an illustration due to its importance in the overall structure of the bowling training process.
The ability to envision the line-of-sight on the lane, to keep it in the mind during the bowling approach, and to subsequently analyze the delivery with respect to the line-of-sight allows the bowler to effectively solve a wide range of tasks, such as:
positioning himself in space and correctly performing the physical game elements relative to the given line;
making a correct analysis of the accuracy of a delivery and of the dynamic characteristics of the ball motion on the lane;
making decisions on the necessary changes in ball trajectory and then rapidly implement them;
and much more!
Thus, the described skill of line-of-sight construction is one of the basic skills of our sport. The degree of its mastery defines the speed of a player successfully training the rest of the skills of bowling. It can be an indicator of his success as a whole on the lanes. In fact, the development of this skill is one of the first tasks facing a coach while training a new player in our sport.
Bowler skill level vs. line-of-sight construction skill mastery level
While preparing this article, I have performed testing of bowling players on their mastery of line-of-sight construction skill and found correlations between the players’ success on the lanes and the extent to which they’ve mastered this skill. Here are some brief details of the results of this study:
Entry-level bowlers: Often cannot imagine and describe in words the ball trajectory on the lane; are not visually concentrating on the point of sight during delivery preparation and execution; often use hitting the pins as an accuracy criterion; have no clear image of the line-of-sight.
Mid-level bowlers: Can describe in words the ball trajectory on the lane; are concentrated on the point of sight (sometimes excessively) during delivery preparation and execution; use assessment of hitting the point of sight as an accuracy criterion; the line-of-sight image is in the forming stage.
Advanced bowlers: Can describe the ball trajectory with precise detail in any area of the lane; are concentrated on the line-of-sight duringdelivery preparation and execution, with the ability to change the visual concentration to various points of sight along the line; use assessment of hitting the line-of-sight as an accuracy criterion detailed in various zones of the lane; the image of the line of sight is clearly formed in the visual imagination of the player and is used with no effort during delivery preparation and execution.
As the results of this test show, there is significant correlation between overall bowler skill level and line-of-sight construction skill level.
Current methods of line-of-sight skill training
All existing targeting systems in bowling are built on the principle of line-of-sight construction on the lane. Differences in targeting systems are only in using different markers as the coordinate system for the line of throw construction (targets, pins, breakpoints, exit points, laydown points, starting position of the player, and so on). The final aim of all systems is a line construction on the lane surface and in the approach area.
Operating with initial data in accordance with the theory of the throw line construction voiced by the coach, the player must use abstract logical, spatial, and visual imagination to construct the throw line on the lane and in the approach area. The player must then hold his concentration to perform a delivery, controlling his own movements and the subsequent movement of the ball relative to this imagined line.
If it is necessary to change the ball trajectory, the player (using information provided by the coach) must recalculate the coordinates of the required markers and construct a new line. This is not an easy task. The main problem is in the constant interaction of abstract logical and visual representation types of thinking.
Even when a player is given initial information in the form of visual images and tips from his coach, the transfer of these images to the real lane is always performed in the mind of the player. In such a case, it is impossible to avoid the process of personal interpretation.
Solving this problem, we are increasingly becoming dependent on the features and level of a player’s abstract logical thinking and the abilities of his mental apparatus regarding the interpretation and transferring of the abstract logical concepts into symbols and images used by visual and representation thinking.
If the player is talented in this respect, we get the correct image in his mind and we get it very rapidly. For other players, perhaps even those who are more gifted in physical and coordination abilities, this task may be very difficult. It may either take a long time to perform, or it may not even be solved at all.
“So what?” you might object to me. “Successful bowling is about survival of the fittest; the most talented players will succeed and thrive!”
In my opinion, the difficulty of solving this problem for the player is not so much due to the level of the player’s ability. Instead, the difficulty is caused by the method of supplying the initial information and the proposed algorithms of solution. Too large of a role of abstract and logical thinking in the described processes can be destructive.
We as bowling coaches are a lot like a teacher who tries to solve the problem of constructing and fixing in a pupil’s visual memory the image of a 90 degree angle. Doing this using only a verbal description is quite difficult. Even if the teacher is permitted to draw two randomly-arranged straight line segments and then explain in words how to form a 90 degree angle from them, it is still an incredibly difficult task.
Alternatively, just draw two perpendicular lines, show the angle, and then add any verbal description for better understanding. The result is instant and the student immediately understands the concept of a 90 degree angle!
A proposed new technique for bowling line-of-sight construction training
I will now introduce a new method of line-of-sight construction training that I have used with great success with many of my students. The method involves using a device to create and consolidate in the spatial and visual imagination and in the memory of the player a bright image of the line-of-sight in the real playing environment during delivery preparation and execution.
While training using this device, there is no need to describe the line image using objects of abstract logical thinking, and, as a consequence, there is no need for any interpretation by the player.
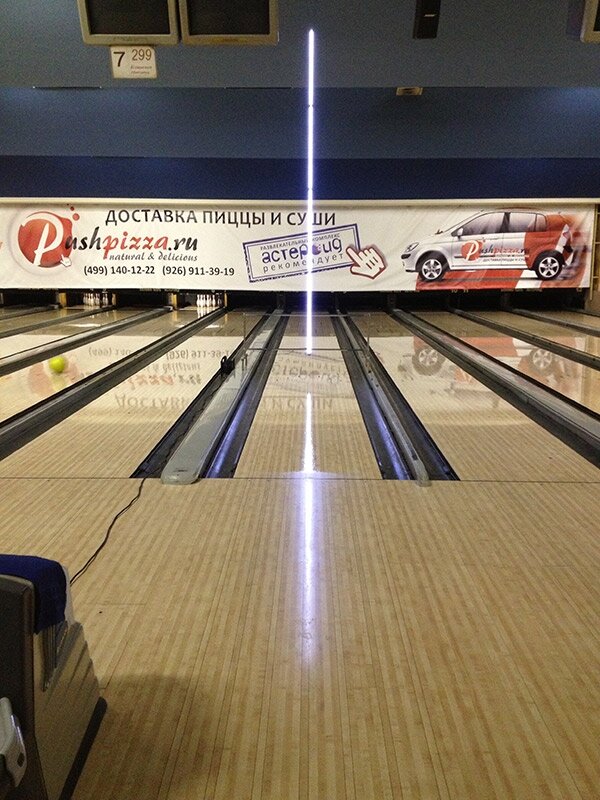
This patent-pending device utilizes a luminous bar (3 to 5 meters high) installed above the lane in a vertical position. Depending on the particular training task, it can be installed in the targeting area, at the exit point, at the breakpoint, or as close as possible to pins. Reflection of this bar creates a bright and clearly visible image of the line-of-sight on the lane. This bright reflected line on the lane is used to train and consolidate the required skill of constructing the line-of-sight by the bowler.
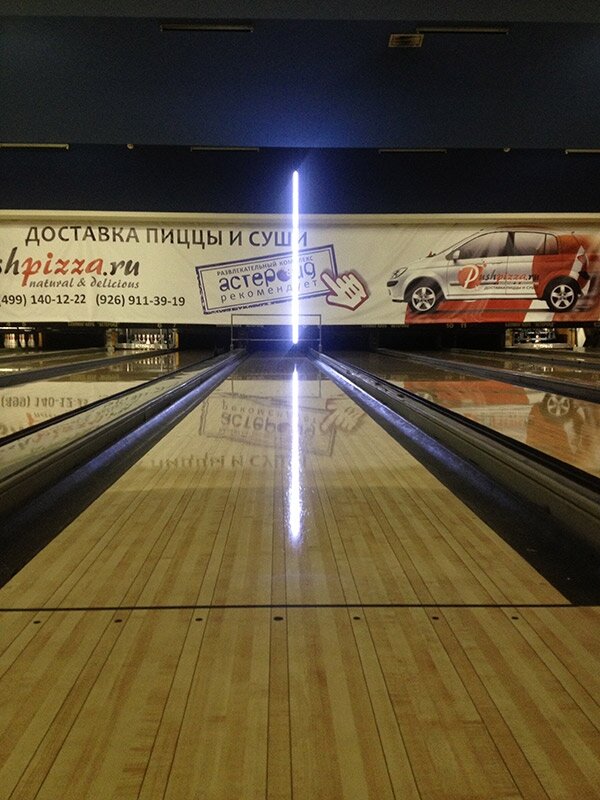
Lighted bar, installed in the breakpoint zone
The property of the reflected line to change its position while the player moves left and right, as well as the possibility to change the initial position of the device, allows the bowler to almost intuitively understand the process of adjusting the line position on the lane.
Since this training technique so directly demonstrates the concept of line-of-sight and its fundamental properties, it is even effective on players who haven’t yet developed advanced abstract logical thinking abilities, such as children.
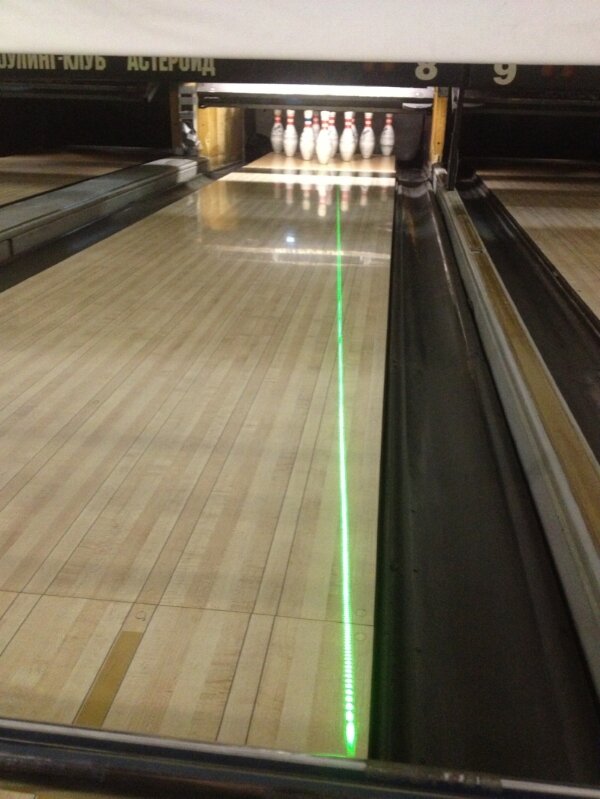
Here, the lighted bar is installed at the arrow zone for the purposes of 3-6-9 training.
Besides the basic training function of teaching a bowler how to construct the line-of-sight, use of this device has generated four important additional benefits:
Hitting or nearly hitting the line visible by the player is only possible with correct technical throw execution.
The possibility to assess visually the dynamics of the line-of-sight movement along the lane by the player during the delivery creates conditions for more effective correction and monitoring of the spatial and technical elements of the approach. This creates a very effective instant feedback system for the bowler.
It becomes possible to see a diagram of oil application on the lane and its variations, because due to different oil amounts in different areas of the lane, the reflection coefficient of the light source varies. As a result, the thickness of the oil in different zones and the dynamics of its changes during play become visible to the bowler.
The reflected light line creates the possibility of performing a visual assessment of lane topography. The curvature of the reflected line shows the deviation of the lane plane from the horizontal plane.
Here are some additional videos of the lighted bar in use during training, both as viewed from the coach’s position behind the approach and as viewed through the eyes of the bowler.
Results
The practical use of this technique has shown that it has high efficiency. The image of the line-of-sight is quickly fixed in the visual memory of the player. After just a few training deliveries, it is not difficult for most players to use this image, even in the absence of the training device.
Mastering the line-of-sight construction skill has become much faster. Testing has shown that the time duration of mastering this important skill is reduced significantly (sometimes by an order of magnitude) through the use of this device and this training method. Additionally, the skill is successfully mastered by players regardless of the development of their abstract logical and visual representation thinking.
Often, after a month of training using this technique, entry-level players show a skill mastery level comparable to that of advanced players. This allows them to progress more quickly in their future training.
Practical considerations and next steps
Some of you might be wondering about the practicality of the above-described training method. It is true that it does require some special equipment. Also, like all things that happen beyond the foul line, use of such equipment requires agreement and cooperation with the bowling center owner.
As of now, there is no commercially-available “off-the-shelf” luminous bar line-of-sight training system. However, it is a fairly simple design that can be constructed from components that are readily available. It can be installed on the lane in about five minutes and removed in three minutes. Also, I have built and used a version of this system that is fully portable. Development of a ready-made system that can be purchased by coaches is a possibility for the future.
Conclusions
I hope you have enjoyed this introduction to some of the challenges in bowling skill training and that I have opened your eyes to the opportunities that exist in developing more efficient training methods for our sport. As previously mentioned, I have studied the theory of effective learning and skill development for bowling extensively. I have many other ideas in different areas of bowling skill development, such as timing training, swing direction training, ball reaction understanding, and more. I hope to share them with you in upcoming articles.
Finally, I welcome your questions, comments, and suggestions, as they will be very beneficial in helping me decide on content for future contributions.
Entry Angle Assessment
Originally published in Bowling This Month - February 2016
In modern bowling, a player’s success depends on the implementation of numerous components: throw execution, ability to measure the characteristics of ball motion, mental and psychological preparedness, and much more. In this article, I want to share my experience in teaching the skill of determining the bowling ball’s entry angle. Mastering this skill allows the player to quantitatively assess one of the major characteristics of ball motion and enables deliberate correction of numerous game components.
In this skill, as well as the line-of-sight construction skill (described in my previous article), visual and spatial thinking are critical. We have to pay the most attention to these types of thinking when learning and using both line-of-sight construction and entry angle assessment skills. When testing players at different levels, most players, including advanced ones, could not determine the value of their ball’s entry angle. In the majority of cases, they could provide only a simple and ambiguous description, such as small, large, insufficient, bad, too much, etc.
This is not surprising, since very few players have had the opportunity to assess this parameter using the currently-available technical feedback systems that provide entry angle data (such as CATS and others). In practice, the skill of entry angle determination is almost always developed over many years of training and long tournament practice. On the other hand, applying the training methods described below, it is possible to obtain improved results in significantly less time, wherein players, using their spatial and visual thinking and memory, are able to determine the entry angle quantitatively using a range from 3 to 6 degrees.
When we evaluate trajectory accuracy characteristics, the lane markings (counting of boards and/or targets) allow us to see and quantitatively assess the ball’s lateral position in different parts of the lane (target area, breakpoint area, position of the ball at pin contact, etc.). This allows us to literally name the number of a board on which the ball is positioned at any given point along its trajectory. For example, when we need to draw the line-of-sight, we can use readily visible marks, such as targets, pins, dots, etc. In contrast, it is difficult to determine the entry angle on the lane due to the absence of readily visible and memorable orienting points.
Laser line projection
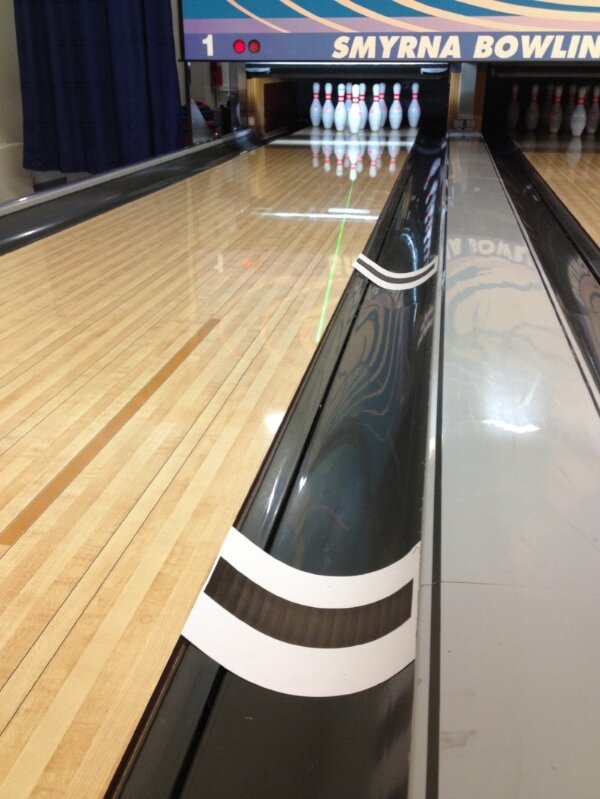
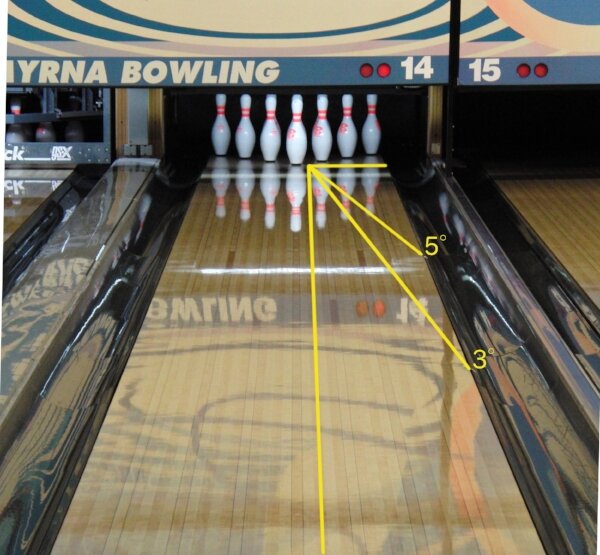
To overcome this lack of orienting points, the student first and foremost needs to be shown the image of the entry angle line on the lane and how the entry angle is determined. For this purpose, a special line laser can be used to “draw” the entry angle line on the lane.
An entry angle line of 5 degrees “drawn” onto the lane with a green line laser.
During the initial training phase, it is important that the student does not focus on the entry angle value. It is most important for the student to see the image of the entry angle line on the lane and memorize that image. A good starting point is to mark the angle at 4 degrees and ask the player how the entry angle of his throw differed from the visible one on the lane.
A powerful memorization technique is for the coach to quickly move the visible entry angle line to reflect the characteristics of the specific player’s throw in order for the ball to pass along the visible line as often as possible. Thus, the player will quickly learn to determine the presence or absence of ball roll as well as the length of the ball roll. This is a very important and useful intermediate skill!
Editor’s note
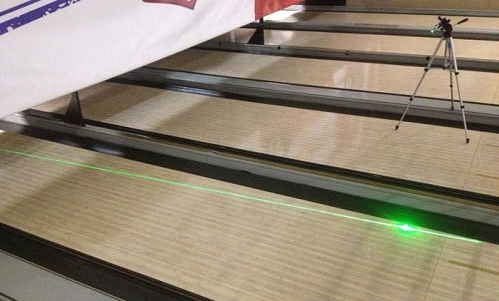
Laser setup example
The laser line in the above image was generated using a standard off-the-shelf 350 mW green laser pointer in conjunction with an off-the-shelf line lens kit, with the laser mounted on a tripod, as shown.
Please be advised that lasers can be dangerous. A 350 mW laser is a Class 3B laser device which can cause harm if used improperly. Among other risks, never look directly into the beam of a laser and never point a laser beam at a person. Never use a laser unless you are properly trained and understand all the possible risks. Also, please keep in mind that the sale and use of lasers can sometimes be subject to government regulations.
It doesn’t take long for the student to memorize the entry angle image when using a bright and memorable laser line. Once the player fully understands these concepts, the next step is to learn how this line ties into a coordinate system which provides the framework to make the necessary quantitative assessment to determine the angle value correctly in the absence of the laser line. There are two very helpful methods for this purpose.
Intervals
The first one is the method of intervals. With this method, the player is taught to quickly analyze and determine various lengths on the lane correctly. In principle, this skill is very important for understating ball reaction.
The goal is for the student to memorize the most important intervals on a lane, including 30 feet, 35 feet, 40 feet, 45 feet, and 50 feet. We approach this task by placing memorable marks, such as paper taped in the gutter, at the desired length or lengths.
An example of using paper markers in the gutter to show the location of specific distances.
An example of using paper markers in the gutter to show the location of specific distance. Of course, this is assuming that the player understands basic lane geometry (such as the width of lane, the distance to the targets and pins, etc.), since memorizing the desired unmarked points requires that the student use all available visual cues. For instance, the 1st pin (at 60 feet) has a reflection that can either correspond to or be very close to one of the desired intervals (50 feet for a taller person, down to 45 feet for a shorter person). Determine what interval the bowler sees and use it.
It is important to understand that the intervals are determined by the individual’s unique characteristics, since they are connected with the player’s height and the height of his eyes in the initial and finish positions. To begin with, focus on memorizing the required intervals from the player’s finish position, as it is critical to choose a consistent and repeatable position from which to memorize visual cues. Moreover, this is yet another argument for the benefit of a stable and proper finish position. Obtaining visual information after releasing the ball from the foul line is facilitated by correct and consistent technical execution.
For entry angle determination, memorizing just the two lengths of 30 feet (half the distance from the foul line to the first pin – 1/2 of the lane) and 45 feet (half the distance from the 30 feet mark to the first pin – 3/4 of the lane) is enough. It is easiest to start by memorizing the 30 feet mark and then later adding the 45 feet mark. Once the student has memorized these intervals, the next training session can focus on learning how these lengths relate to the two entry angles of 3 degrees and 5 degrees.
Ideally, using two laser lines, the coach should indicate the 3 degree line extending from 31 feet to the pocket and the 5 degree line from 42.5 feet to the pocket. Remembering the memorized visual cues for 30 and 45 feet, the student can simply add 1 foot for the 3 degree line and subtract 2.5 feet for the 5 degree line in order to commit these angles to memory.
In order to achieve different entry angles, balls and throw execution parameters (speed of throw, axis tilt, ball trajectory, etc.) can be changed. The table below shows the entry angle which corresponds to the given length of the lane edge from the foul line.
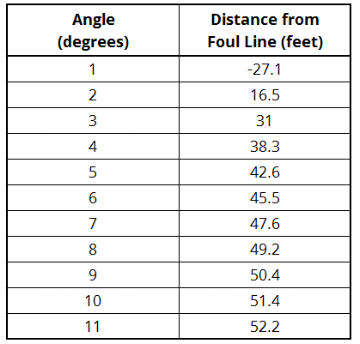
Angle vs. distance for a line drawn from the gutter edge to the pocket.
At this point, the student has learned a significant and complex skill set: a practical understanding of the detailed range of his ball arsenal and the effect of changing throw characteristics on the ball trajectory.
The use of a device for marking the aiming line, described in my previous article, in combination with marking the entry angle line(s), is an efficient technique for teaching the player to consolidate these skills.
Retinal angle assessment
For further consolidation of this newly acquired skill, there is another approach to memorizing the entry angles that a player sees. Have you ever asked a beginning student or spectator about the entry angle value they perceive? The answer is consistently 45 degrees. This is accurate if the angle is assessed as obtained by the retina at the foul line. It matches the angle measured on video or photos.
A bowler’s perception of entry angle is typically very large (shown from a height of 4.5 feet at the foul line).
Retinal angle assessment can be used to obtain the true angle. In order to do this, the coach must determine the characteristics of the player that will influence their perception of the entry angle. The table below shows the height of the player’s eyes at the finish position which corresponds to their perception of 3 degrees and 5 degrees.
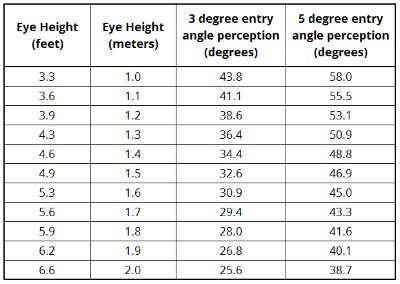
Entry angle perception (retinal angle) from the bowler’s perspective vs. height.
In applying this assessment method, the difference between these two angles (3 degrees and 5 degrees) as viewed by the bowler is approximately 15 degrees. For example, if the height of the eye is 1.6 meters (5.3 feet), the angle of 3 degrees is perceived as 31 degrees and the angle of 5 degrees as 45 degrees. These angles are fairly easy to remember. Simply measure the height of the player’s eyes at the finish position and print the respective angles for memorization.
Finally, once the player has fully understood the entry angles of 3 degrees and 5 degrees, he can extrapolate from there to additional angles. For instance, knowing 3 degrees and 5 degrees, the player can easily see when the ball’s trajectory is between these memorized points and determine the angle to be 4 degrees. Equally an angle less than 3 degrees would be 2 degrees or slightly more than 5 degrees is 6 degrees. The ability of the player to determine the range of angles helps him assess the situation on the lane and ultimately provides the tools to consistently obtain the ideal entry angle during competition.
Changing Lanes
With the invention of the Kegel LaneMapper, came a study about bowling lane topography like no other in the history of the game. Truth be told, when lanes were made of wood, and resurfaced in a timely manner and taken care of by craftsmen, topography was not really an issue. But with the proliferation of synthetic lanes and overlays, along with lanes getting minimal attention today, topography is much different and more influential than in past times – and the Kegel LaneMapper has been able to show it.
We now know what lanes shapes favor different type ball rolls. We know exactly why the same oil pattern can play completely different from one center to another. We know that different lane shapes can affect the durability of an oil pattern, or lane conditioner. And we know that different types of lane constructions are not created equal, nor do they change equally. It’s within this last statement this edition of the Inside Line will focus on – how synthetic panels laid on top of wood lanes can change with seasonal changes.
“All lanes look flat, but they really aren’t.”
We’ve always known that wood lanes change from summer to winter. In the days of regularly resurfaced and maintained wood lanes, we saw depressions go from the minus .010” range to maybe the minus .020” to .030” range in the winter months – a depression increase of 10 to 20 thousands of an inch. In climates where seasonal changes and humidity differences were greater, so were the changes in the lanes.
But today, because of the aforementioned lack of attention lanes receive, we are seeing changes much greater from season to season - especially in climates that have greater seasonal differences.
A big part of Kegel's original Mission Statement was “we study the game of bowling”. It was a mandate from the late John Davis. This edition of the Inside Line will focus on some of that study from bowling centers around the world, and we will show how much, and how fast, bowling lanes with synthetic overlays can change in shape.
Real World
Our first example is from a bowling center located in the northern hemisphere. Being in the north, there can be significant differences in humidity from summer to winter - it is humidity that makes wood change in shape.
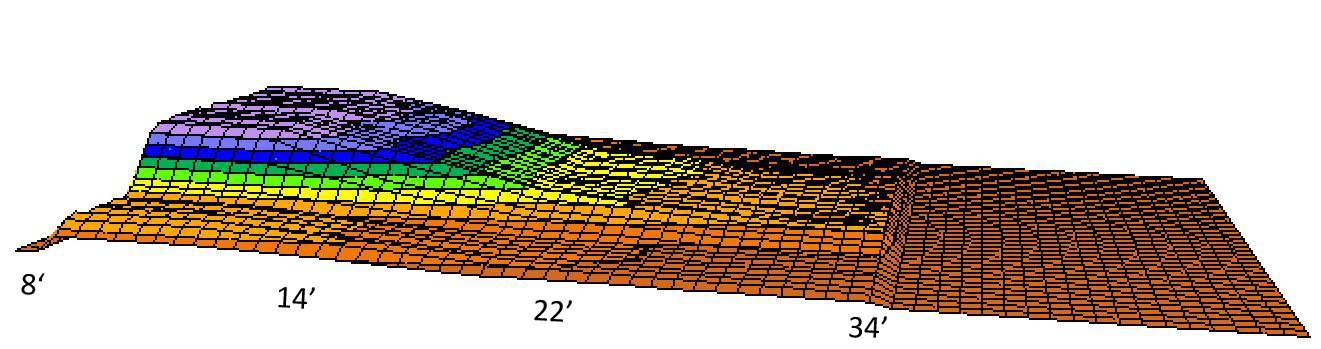
The graphic below is a lane with a synthetic panel on top of existing wood lane (overlay) in the summer time when the humidity is highest. Humidity always enters wood in the area of least resistance and with a wood lane humidity enters the wood from the bottom of the lane.
Synthetic overlay measured in August when humidity is high.
We call this a ‘bird wing’ shaped lane because the wood lane pushes the panel up between the screw rows (2L, 20C, and 2R boards) causing a hill around the 10 board. This lane shape will cause hang spots outside of second arrow, and “hook” inside of second arrow. Medium length patterns are most difficult on this lane shape.
The wood lane underneath the synthetic panel "pushes up" the panel between the screw rows causing the shape of the lane to resemble a bird wing.
What is also interesting is the lanes in this center pass the plus/minus .040” specification at every distance on the lane, in the summer time.
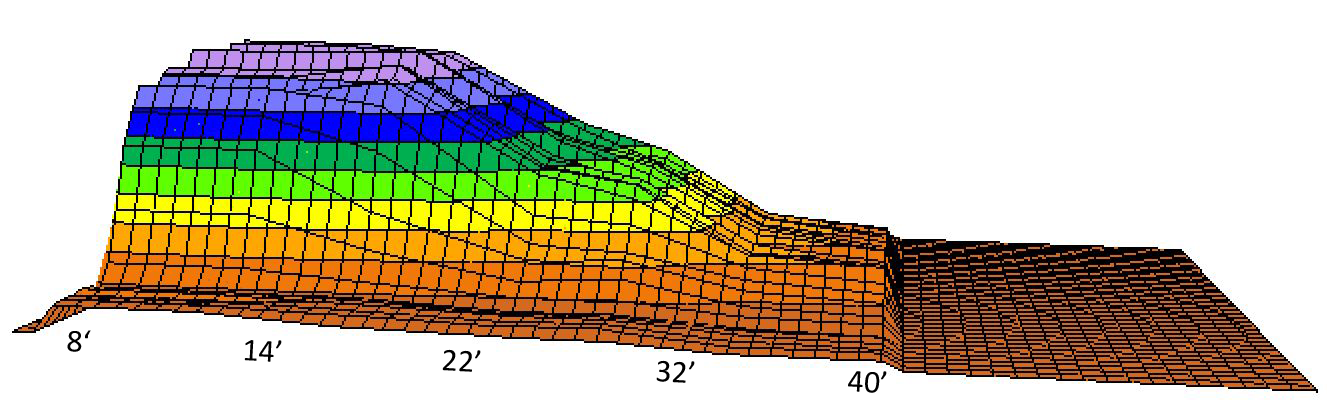
The below graphic shows what the lane looks like during the transition from summer to winter, or winter to summer. In the fall time, the humidity has decreased causing the moisture in the wood lane to also decrease - everything is contracting and the panel takes shape of what’s underneath it. In the spring time the process is reversed. Medium oil patterns begin to play easier - actually all oil patterns begin to play easier.
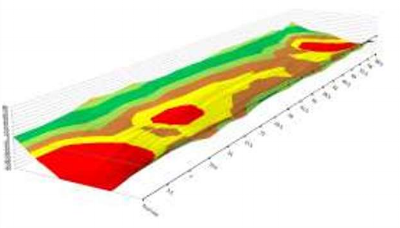
As the humidity begins to lower, the moisture in the wood lane begins to release, making the wood lane contract. Measurements taken in early November.
Where the lane gets the most abuse, the head area, the depressions begin to exceed the minus .040” specification. The toe screws holding the wood lane together, and the screws that hold the wood lane to the levelers below, are getting loose, or back out all together in many instances. The lane acts like an accordion.
It must be noted that when the heads are cut out and replaced with a substrate like MDF, we do not see these huge depressions. Synthetic panels on top of a substrate like MDF, HDF, or PSL, do not seem to be affected near as much during seasonal changes.
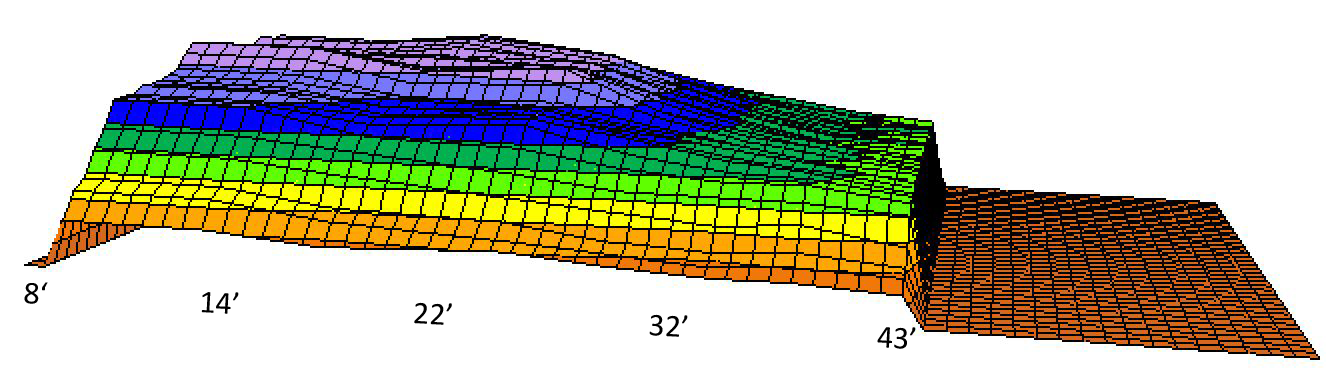
Below is what the above lane looks like in the winter time, when the humidity is lowest. In some instances, bowling centers may even turn the heat on, which lowers humidity even more. It's at this point in the year most of the moisture has come out of the wood lane and the depressions are the greatest. This is also when oil patterns tend to play the easiest; everything “ramps back” to the pocket.
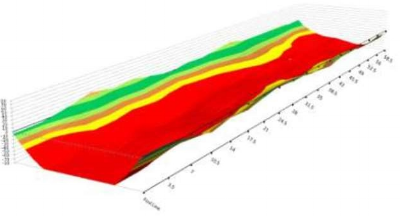
When the humidity is the lowest, the depressions increase the most.
What may be thought provoking for some is, every distance on this lane has now exceeded the minus .040” specification. We have seen this in more than a few instances.
Oil patterns on a lane with depressions of this magnitude will also tend to break down quicker, when playing outside of center. This happens because there is more pressure (gravity) pushing up against the ball when outside of center so it's easier for the ball to "poke through" the oil film on the lane - the “shot” will tend to go inside quickly because of that. Think of a car rounding a curve on a banked road or race track - the banking is there to help a car navigate the turn.
This is when lofting the gutter often comes into play on competitive longer patterns - the ball will “see the lane quicker” as the pattern breaks down on the uphill slope. So players quickly move to and play the downhill side of the depression as long as they can. Physics dictates that the ball will retain energy longer on the downhill side of depression and then hook off of the uphill side easier. Once deep inside, bowlers with high rev rates, high axis rotations, and high tilts will benefit the most on this lane shape - that's physics at work also.
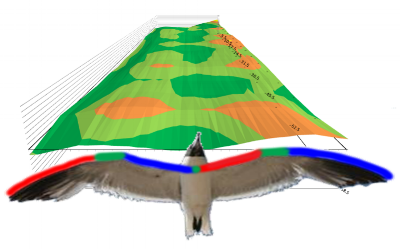
The Kegel Slope Graphs make the slope differences even more apparent:
Same lane over the coarse of seasonal changes.
The Slope Graphs are revolutionary in bowling because they are the first illustrations that show the severity of the ‘rise and falls’ on a bowling lane. Slopes to the right are in the blue color spectrum – the darker the color the more severe the slope to the right. Slopes to the left are in the orange/red spectrum - the darker the color the more severe the slope to the left. Read more about Kegel's Slope Graphs.
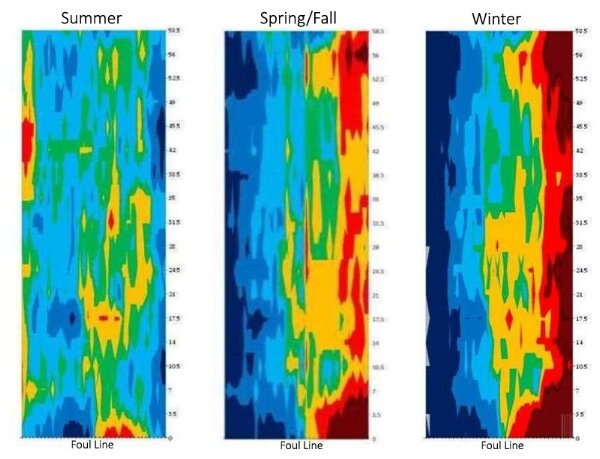
How fast can lanes change?
The following graphic shows how a synthetic overlay pair of lanes can change over the course of 28 days – from May 17th to June 13th. This center is also in the northern part of a country and one floor below ground level – so if anything changes are less than a center on the ground floor or above. The foul line is at the bottom of the graphic.
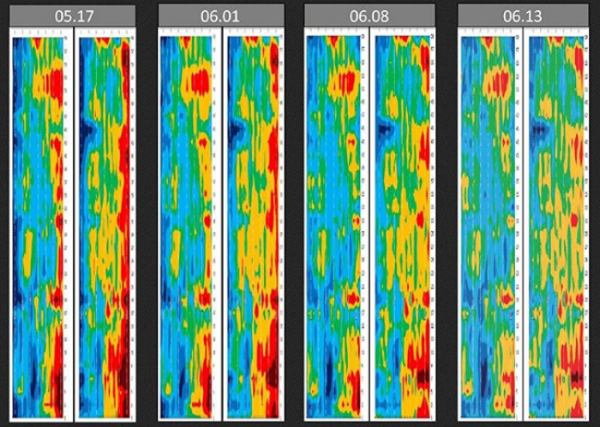
A pair of synthetic lanes with overlays changing during a 28 day period - from May to June. The foul line is at the bottom,
What to notice here are the slopes on the outside part of the lanes – reds on the right are slopes towards center and blues on the left are slope towards center - so the lanes here are predominantly depressed at the beginning of this time frame.
Over the course of 28 days it is clear that the depressions are decreasing. The reds become lighter in color so the movement towards center is less influential, and some areas of the lane are even turning to blue in color, which indicate slopes to the right. Hang spots are caused by these "outward slopes". What we noticed during these 28 days was "the oil pattern" became tougher as the lanes flattened out - gravity always wins on planet earth.
If we talk about the raw data, the lanes were changing (swelling up) about 6-7 thousands of an inch per week as it takes in moisture. In 28 days the depressions went from the mid-minus 30 thousands of an inch to less than 10 thousands of an inch. And the process will reverse itself come fall time as the wood releases all that moisture.
“Gravity always wins on planet earth.”
How this can help you – the proprietor, the bowler, the coach, the federation, or the tournament organizer.
With synthetic lanes it’s even more crucial to see these slopes because it’s the only way we can really understand what’s happening with ball motion – is it friction or a significant slope causing the ball to hook too much, or not enough?
Knowing the shape of the lane at different times of the year will tell you the answer, and it will also tell you how an oil pattern will play, develop, and breakdown.
For instance; when the wood underneath the synthetic swells up in the summer your pattern will play longer or it seems like carrydown comes out of nowhere – the ball has a hard time moving towards center, when the lane is sloped towards the gutter.
This lane swelling can also "make the shot" go more inside as bowlers stay away from the hang area towards the outsides.
This is especially important to any one bowling center when trying to provide lane conditions for their weekly league customer base. If your center has lanes that change as much as these examples, you may need different house patterns for different times of the year so the house playing characteristics stay more similar.
It’s also important to know if a bowling center wants to “experiment” with a different oil pattern or try a new chemical product. If you don't which way your lanes are changing, or how much, it will be difficult to know why things are playing the way they are.
It’s important for tournament organizers or federations to know so when they ask for a pattern months in advance they have a better idea of what to expect come tournament time. Testing an oil pattern in one part of the year and expecting things to play the same at another time of year will often make the question "what happened" arise.
It’s important for coaches and bowlers so they can properly prepare for an upcoming tournament, or make the proper adjustments when the bowling ball is not reacting like they think it should.
Technology can definitely make life easier when used in the proper manner – the Kegel LaneMapper is one of those advances.
When used it can definitely help a bowling center get know their lanes better and use oil patterns that compliment the predominant shape of those lanes to provide more consistent playing conditions for their customers.
Or better yet, the LaneMapper can tell you where and how to correct your lanes if needed so they are "fair" for as many styles as possible.
In a game like bowling, providing equal opportunity for as many different playing styles as possible should be the goal. It worked before and although history may not always repeat itself, it sure does rhyme.
What to LOOK for when choosing a "Coach"
Once you have bowled several games and have a feel for the "game", I think that it is very important (and necessary) to start looking for a "Coach". Why? Improving your scores is essential in getting more enjoyment out of this great game.
Based on your experience (basically how many games you have bowled), will help you to determine just how serious you want to be. The "rule of thumb" and "what to look for" in choosing a Coach is stated below. (NOTE: These are not listed in any particular order, as the reasons are all equally important).
REMEMBER: "You" are the student and you need a good teacher. Interview your prospective Coach to see if they have the following qualifications. You may you need more than one.
• Motivators: All great Coaches in all sports have the innate ability to motivate their athletes. Be sure that your Coach has this ability.
• Fundamentalist: Be sure that your Coach knows the proper fundamentals of the game, from: "push-away" to "timing" to "follow-through", etc.
• Knowledge of Equipment: It is so important in today's game to have a Coach that has a thorough knowledge of bowling balls. Be sure that they do.
• Knowledge of Lane Conditions: With the game getting more and more technical, a Coach that knows about lane conditions is essential.
• Positive Mental Attitude: Does your Coach have a "positive" Mental Attitude? If not, it's time to find one that does.
• Disciplinarian: A tough Coach is the best Coach. If you think that you hate him/her because they make you work hard, you will love them later on.
• Realistic Goal Setter: Are you honest with your Coach? Is your Coach honest with you? Be realistic when you both set YOUR goals. Frankly, being a World Champion is NOT for everybody. "THAT" takes many things and is clearly reserved for a very few of the extremely talented individuals. HOWEVER, there are many other goals that can be reached. Set your goals realistically (best on your team, best in your bowling center, best in your city, best in your state, ABC Hall of Fame, etc.).
I hope that info helps when it is time for you to decide on getting a Coach. You are never too young or too old to start learning and improving in this great Sport.
REMEMBER, NOT everybody is a Coach. Only a few are qualified based on the criteria listed above. I'm sure you have heard a team-mate tell you that you are "dropping your shoulder" or: "not following through". Certainly, they all mean well. BUT - are they telling you ‘why’ or ‘how’ you can fix this particular problem?
Decide today to seek some quality help from a qualified Coach in your area.
The One Thing That Really Makes Oil Patterns Play Different
Normal force, N, is the force that pushes up against an object, perpendicular to the surface the object is on. In other words, the normal force is the force pushing the two surfaces together. The stronger the normal force, the stronger the force due to friction.
How often have you experienced an oil pattern that didn’t play anything like the pattern graph suggested it would? The pattern was ‘x’ length, the high point of the oil on ‘y’ board, yet when you played on it your ball didn’t react anything like you expected, and the optimum pattern exit point wasn’t near where it was “supposed to be”.
From there we look for explanations, and we might get answers like; “the temperature was different today”, “it was raining outside”, “the lane machine put out the wrong pattern”, or who knows what else. In past years technology might not have been available to check things, so theories flourished.
Today, however, we can use technology to confirm the correct pattern is in the lane machine. We can use the Lane Monitor to make sure it was applied correctly to the lane. And with the Kegel LaneMapper, we can even measure the topography of the lanes to see if and how that influenced things.
Knowing and understanding these critical components about our invisible playing environment can help us answer the infamous question every person entrusted with lane conditions has heard at least once in their life; “what happened?”
What lane topographies are most common?
The Kegel Training Center has 12 fully adjustable lanes that can be shaped to mimic almost any lane topography known to exist. After measuring thousands of lanes over the years we have shaped three pairs of lanes in the KTC with some common topographical shapes, and one pair of lanes we consider as “fairly neutral”.
Neutral lanes are not perfectly flat, no lane in the world is, but a neutral lane has topographical slopes on them which do not “overly disturb” the ball as it travels from the foul line to pin deck.
We see neutral lanes often when they are made of wood and resurfaced regularly – these lane types are the “flattest” lanes with regard to topographical shape.
We also see neutral synthetic lanes, but not very often. In fact, of all the synthetic lane bowling centers we have mapped over the years we can count the number of centers having totally neutral synthetic lanes on one hand – it's definitely the exception, not the rule.
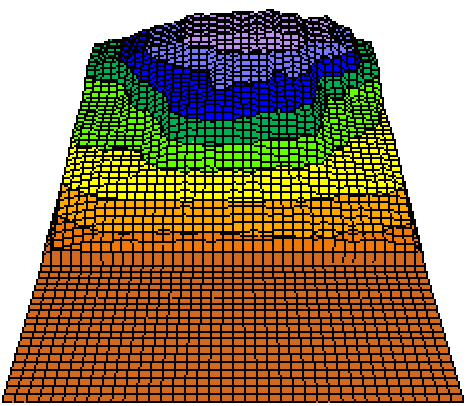
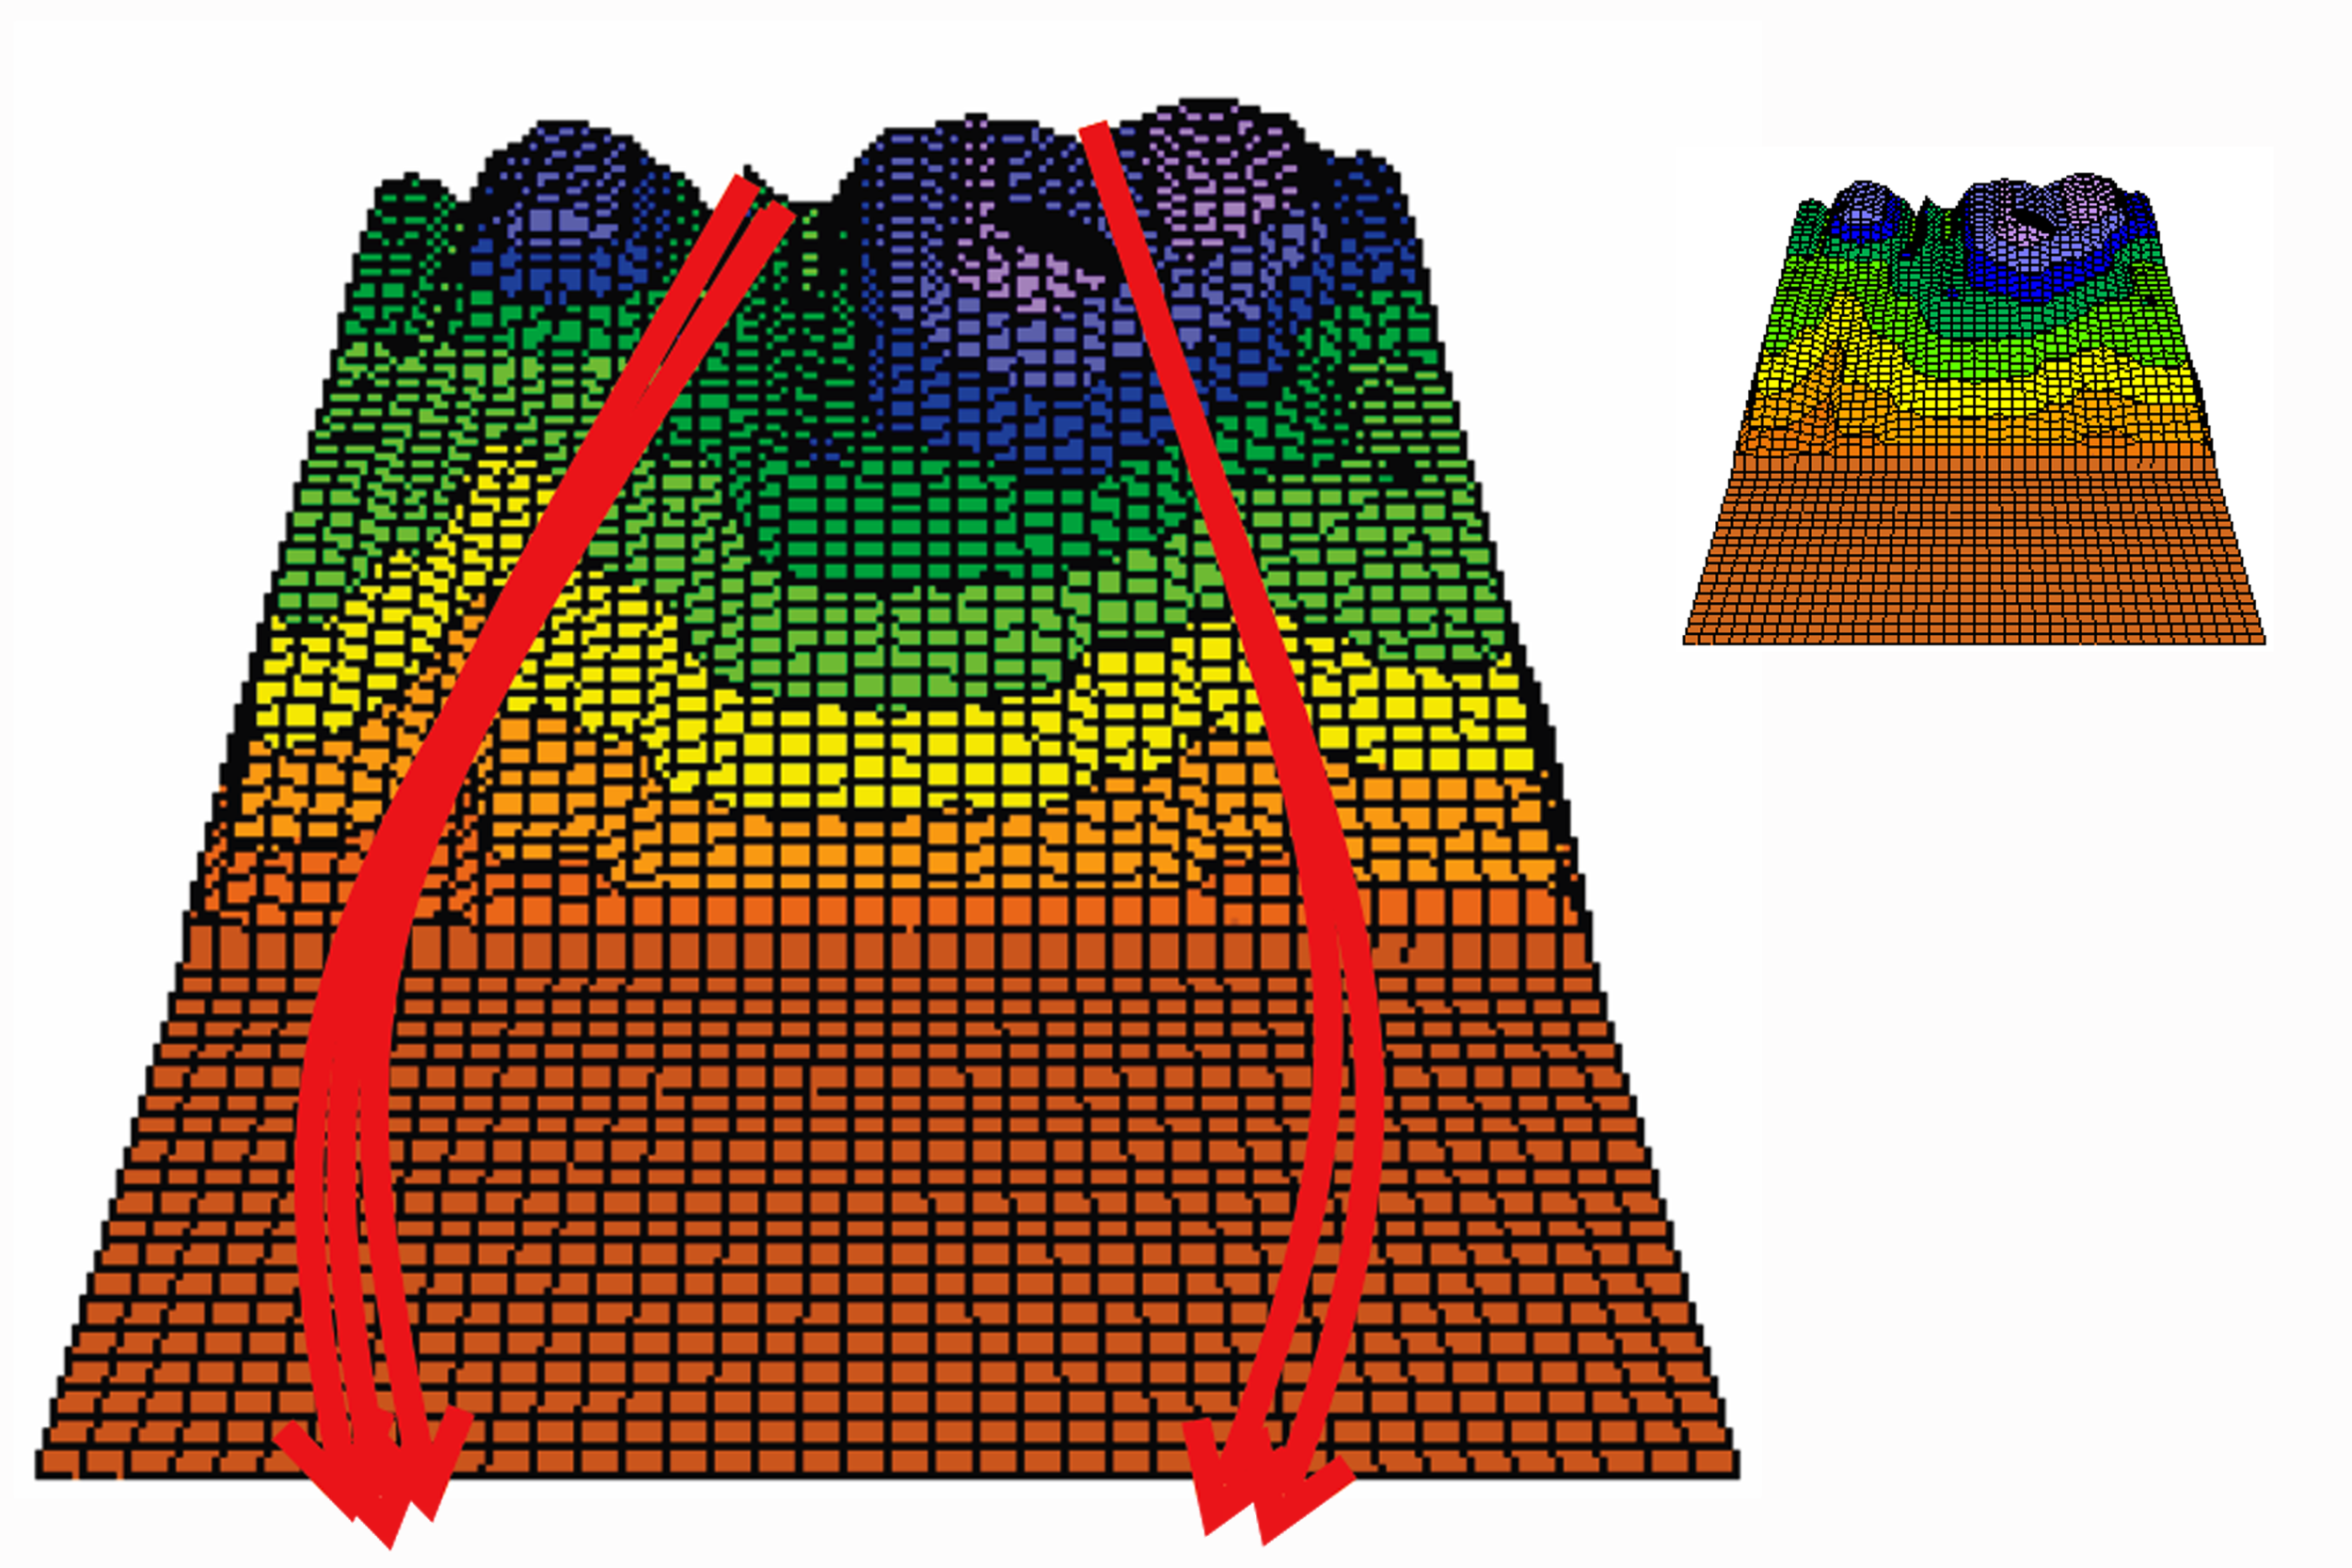
The three most common topographical shaped lanes today are what we call a seagull-wing or bird-wing shape, depressed (dish-shaped), and crowned (mound-shaped). These lane shapes are where things get interesting with regard to oil patterns, how they play, and maybe most important, how they develop as the oil pattern breaks down.
Seagull-wing shaped lanes have slopes towards the center from around the second arrow, and slopes towards the gutter outside of that. This happens because a synthetic panel is mostly screwed down on the outside 1st or 2nd boards on either side and then in the middle on the 20th board. In-between there are no securing screws “holding the panel down” other than where the panels meet, which is only every 10’ or 12’ depending on the manufacturer.
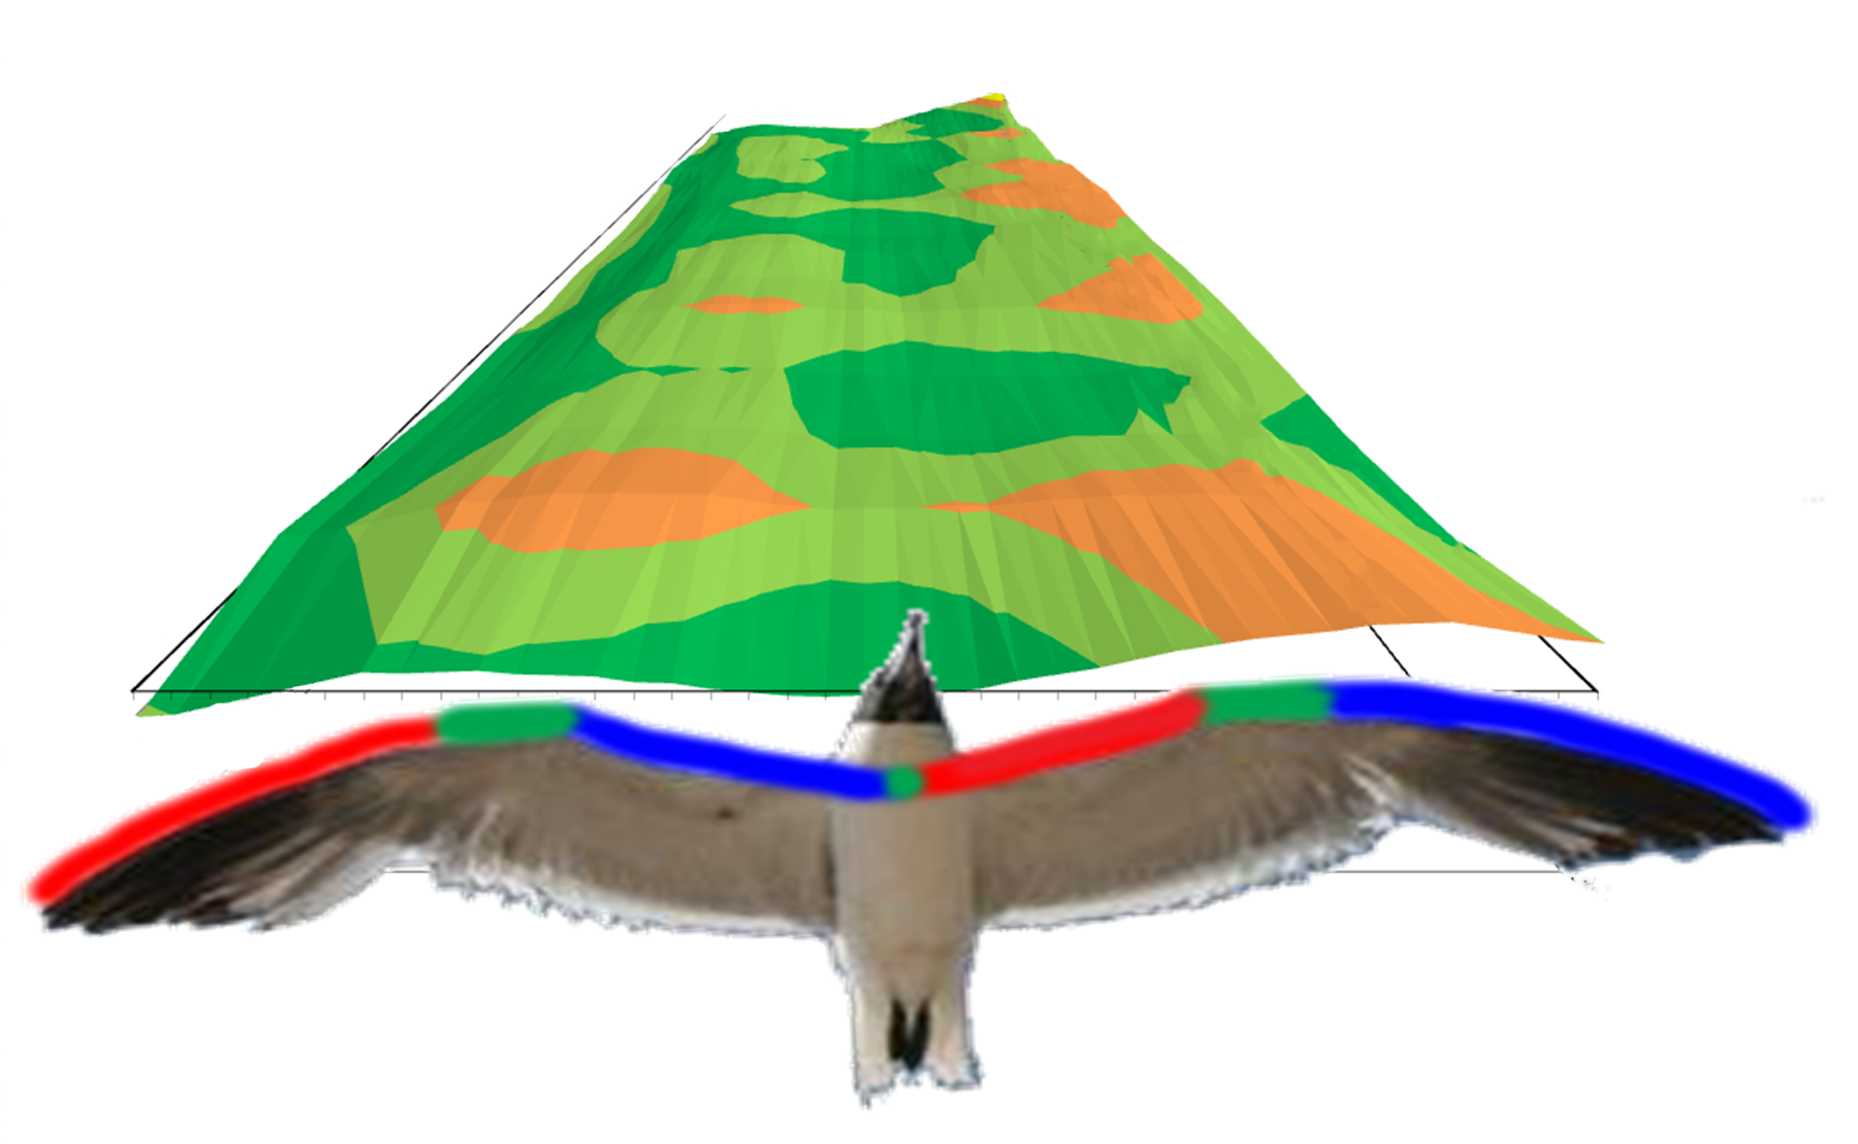
Seagull or Bird Wing Lane Shape
In the summertime when the humidity is high, or in climates with high humidity, we see this lane shape very often - especially when wood lanes are underneath the panels.
Moisture penetration on a wood lane comes from the bottom of the lane where the boards are put together essentially making the lane swell up, which then pushes up the panels in-between these rows of securing screws. This causes the lane to “mound up” around the 8-9-10 board creating slopes towards center inside of that area, and slopes towards the gutter outside of that. The resulting shape resembles a seagull's wing.
Furthermore, in both new lanes with a continuous LSL underlayment (Laminated Strand Lumber - an engineered wood product) and for certain manufacturers who use MDF or LSL to replace the old wood head section, there is a similar securing-screw pattern.
Just like the lane panels themselves, the underlayment is top-screwed in three spots across the lane, near the two outer edges and near the middle, at each of the 30 or so securing locations along the 60' length of the lane. This can also create a bird-wing shaped lane; albeit not as severe as what we see with a wood lane underlayment in high humid environments.
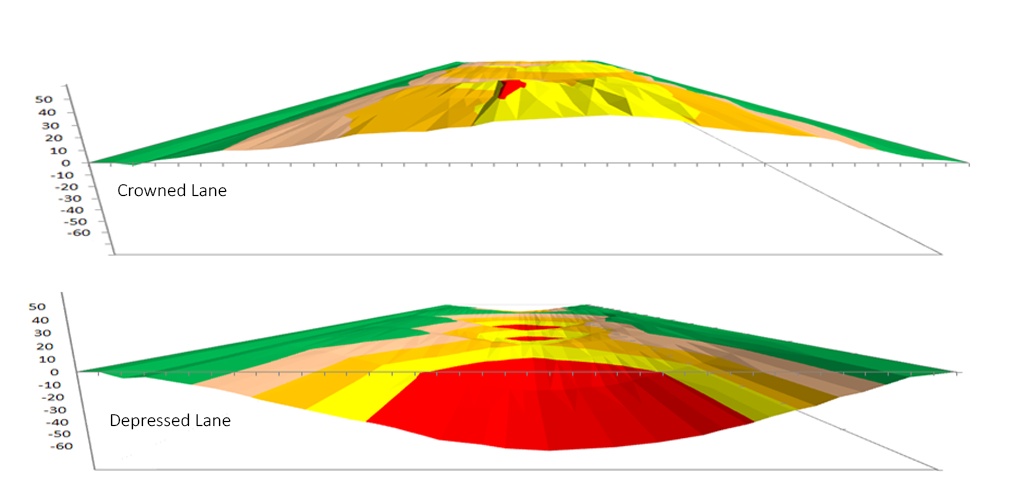
Crowned lanes also happen in year-round climates with high humidity; like Island countries, cities by the sea, or in Southeast Asia. This often happens with overlays where the wood lane underlayment was not screwed down in the middle prior to the lane panel installation.
Depressed lanes often happen in lower humidity climates, or in the winter time, with a wood lane underlayment. In fact, all wood lanes are cut with a slight depression in them, but the longer the panels have been on top of the old wood lane, the more they tend to depress - especially in the area of the lane that takes the constant pounding of the bowling ball, the first third of the lane.
Have you ever notice that scores often go up after Christmas time? This is when a wood lane, or synthetic panels on top of wood lanes, become most depressed because the moisture has finally been released from the wood causing it to contract (shrink). Think of a high banked race track - it's much easier to navigate the curve.
New synthetic lanes can also be installed with a depression, but rarely do we see a nice smooth depression like a resurfaced wood lane has.
Although we see these type lane shapes often down the entire lane, we also see at times a combination of shapes on any one lane. For certain type overlays, we often see very depressed heads and slightly beyond (mostly related to ball impacts), and then bird-wing shapes after that.
In the case of a new synthetic installation, we often see topography slopes that are totally random throughout any one lane, or even within one panel.
Lane shape is more the reason than anything else why certain styles (ball rolls) “match up” to certain bowling centers.
Because of the invention of the Kegel LaneMapper and resulting Slope Graphs, we now know why, and we can show it.
Where the rubber meets the road
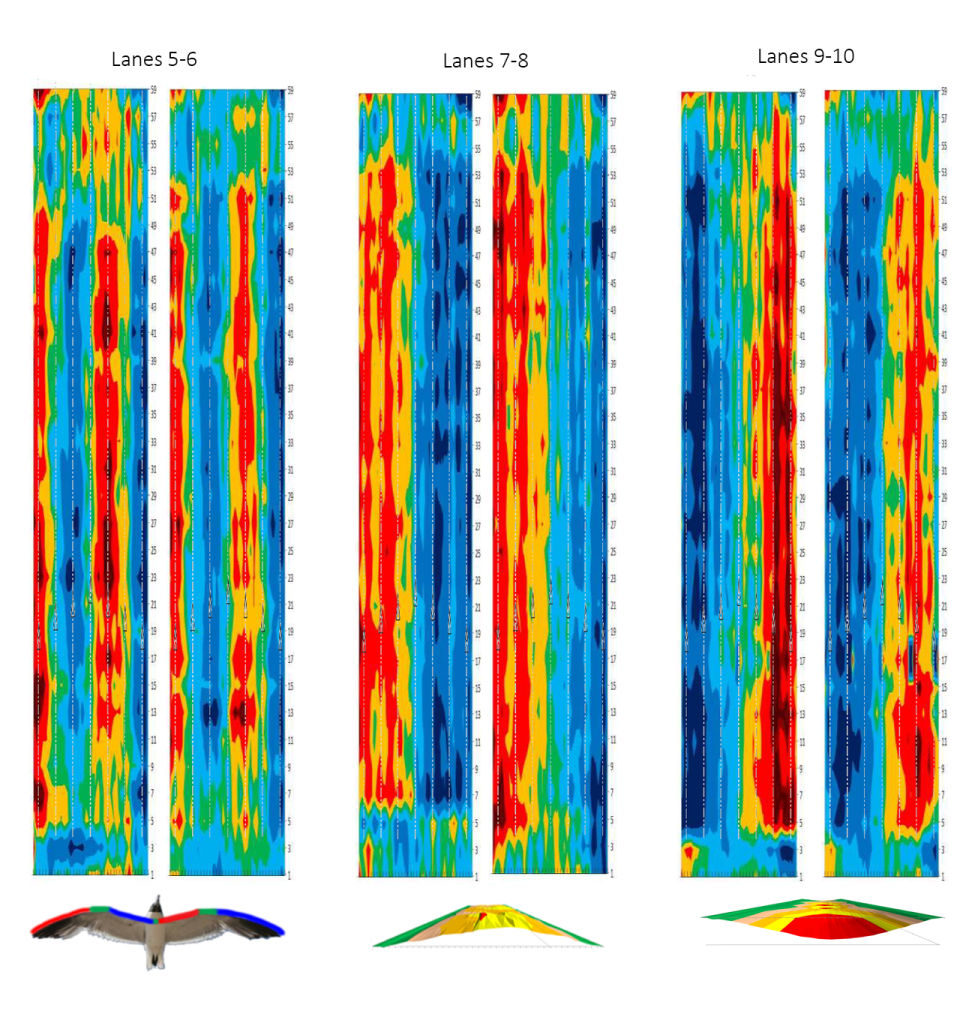
A few months ago the Men’s National Team from Sweden came to the Kegel Training Center with a special request; to learn more about topography and train on lanes with topography differences. So to prepare for their visit we adjusted lanes 5-6 with a seagull-wing shape, lanes 7-8 with a crown, and lanes 9-10 with a depression. We also made sure the lanes remained within USBC specifications.
Below are the Slope Graphs of each pair of lanes:
Remember, the specification for lanes is plus/minus .040”, and it does not specify which way a lane must be shaped in order to satisfy those requirements. The specification also does not state over how many boards those min/max numbers can hit their limit, and that’s where things can get interesting.
For instance, if there is a .024” rise on the lane from the gutter to the eighth board, that’s an average Slope per Board of .003” – that equates to a smooth cross-tilt of .120”. The ball has a very hard time “hooking back to the pocket” on a slope this severe and we see this more often than you might think.
For more about Slope per Board, read this article: Kegel’s Revolutionary Slope Graphs.
So how does lane topography affect an oil pattern and the resulting breakdown?
This is where we have learned the same thing Sir Isaac Newton learned – you can’t fight gravity, you can only work with it.
For a little test and learning experience for all involved, we decided that the 12 players from Team Sweden would bowl six games across the three pair of lanes moving every game – this would make all players hit each pair twice.
There were three left-handed players and nine right-handed players. We chose a medium length oil pattern from the 2017 World Bowling patterns, Beijing.
Here is what the fresh oil pattern looked like, with the foul line being at the top of the graphic:
2017 World Bowling Beijing oil pattern
After 12 games of bowling, we took after tapes on each of the pairs to see how the players broke down the oil pattern on these different lane shapes.
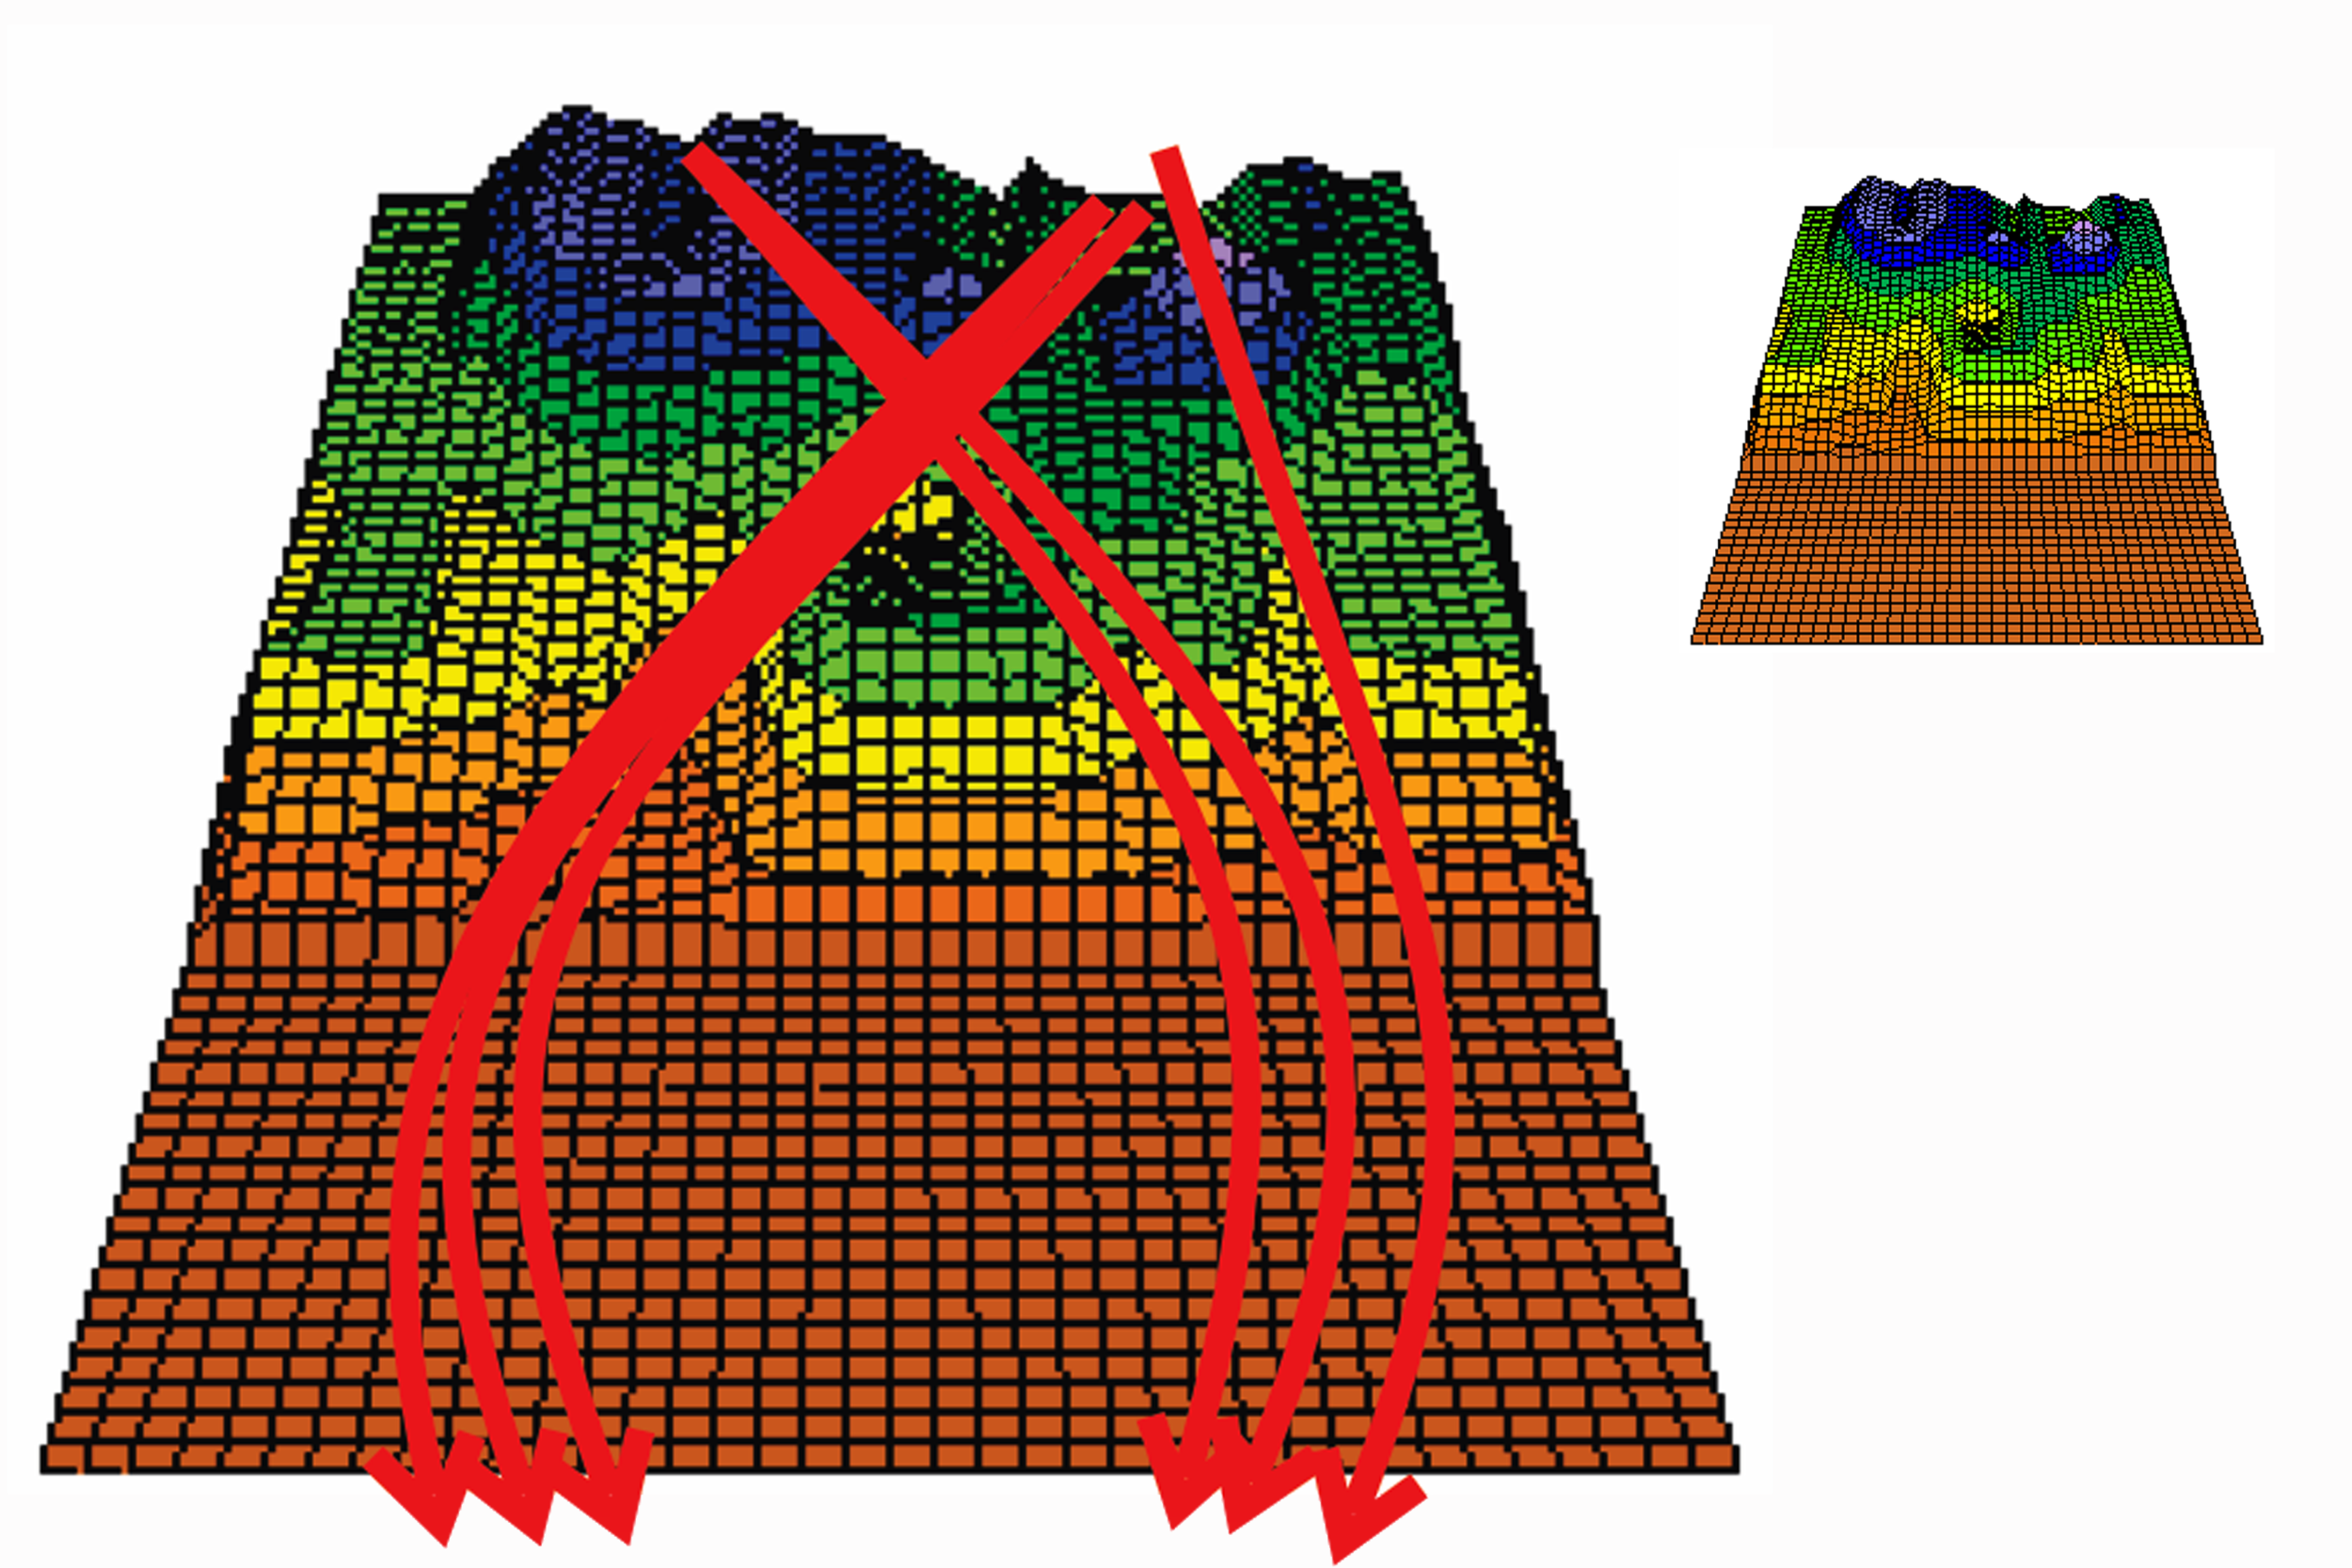
On lanes 5-6, the bird-wing shaped lane, players tried to play outside in practice but the slopes towards the gutter made it play very difficult - they immediately “moved inside” and away from the “hang spot”.
Beijing oil pattern breakdown on the bird-wing shaped lanes
The after tapes show the paths of all balls by way of oil pattern depletion. From these tapes, we can clearly see both left-handers and right-handers played deep inside on this pair of lanes. Our tape data also shows the farthest outside anyone got was on board 9, because there was hardly any pattern depletion of the pattern outside of that. Specto data confirmed this depletion observation.
On lanes 7-8, the crowned pair of lanes, everyone stayed much more outside and never migrated that deep - in fact, they never got inside the third arrow. A few factors involved here; gravity simply helps “push” the ball towards the outside, and the ball doesn’t see pattern breakdown near as much because it's rotating "with the slope" - Normal Force is lessened.
Beijing oil pattern breakdown on the crown shaped lanes
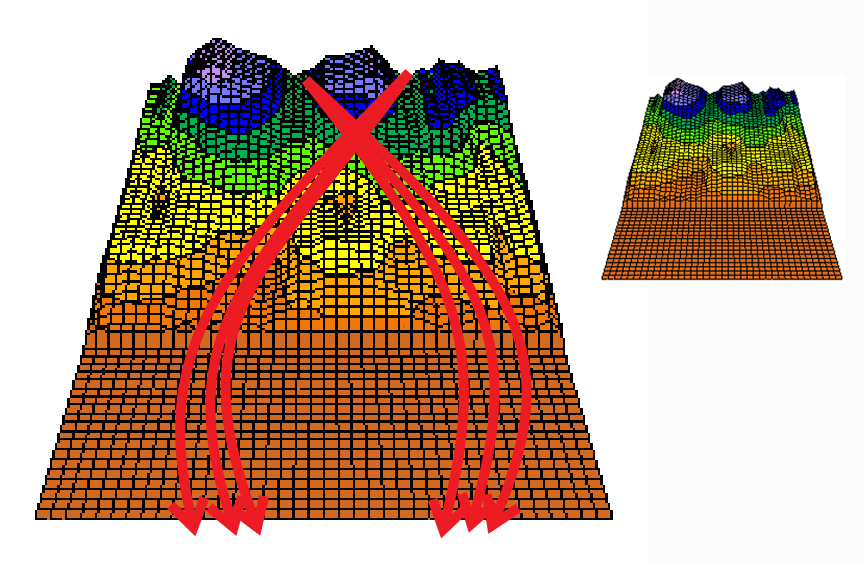
On lanes 9-10, the depressed shaped pair of lanes, the depletion data shows how quickly everyone moved inside and how far they banked it to the towards the outside part of the lane – there wasn't a "hang spot" on that lane.
From our experience we know the ball “sees breakdown" much quicker on the uphill side of a depressed lane because the lane is essentially pushing up against the ball (greater Normal Force) making it “poke through” the thin oil film easier, which causes more friction and makes the players move inside quicker.
Once deep inside and players can play the “downhill side” of the depression the oil pattern might even feel like it has “stabilized” when in fact, it’s just gravity helping the ball “push” towards the outside. In this case, we literally mean push.
This lane shape is the main reason lofting of the gutter comes into play. Along with the pattern "feeling" like it's breaking down quickly, by lofting the gutter cap the ball is able to remain on the downhill side of the depression longer. This allows the ball to retain more energy while also creating a bigger margin for error, along with improved pin carry.
If players tried to stay to the right towards or on the uphill side of the depression, the ball would simply use up energy too quick, minimizing both pin carry and mistake area.
Beijing oil pattern breakdown on the depressed shaped lanes
Along with depletion data, we used Specto to track the ball paths on each lane. The below graph shows the average lines of each right-handed player during the last game; the blue line is the bird-wing shaped lane, the orange line on the crowned lane, and the grey line on the depressed lane.
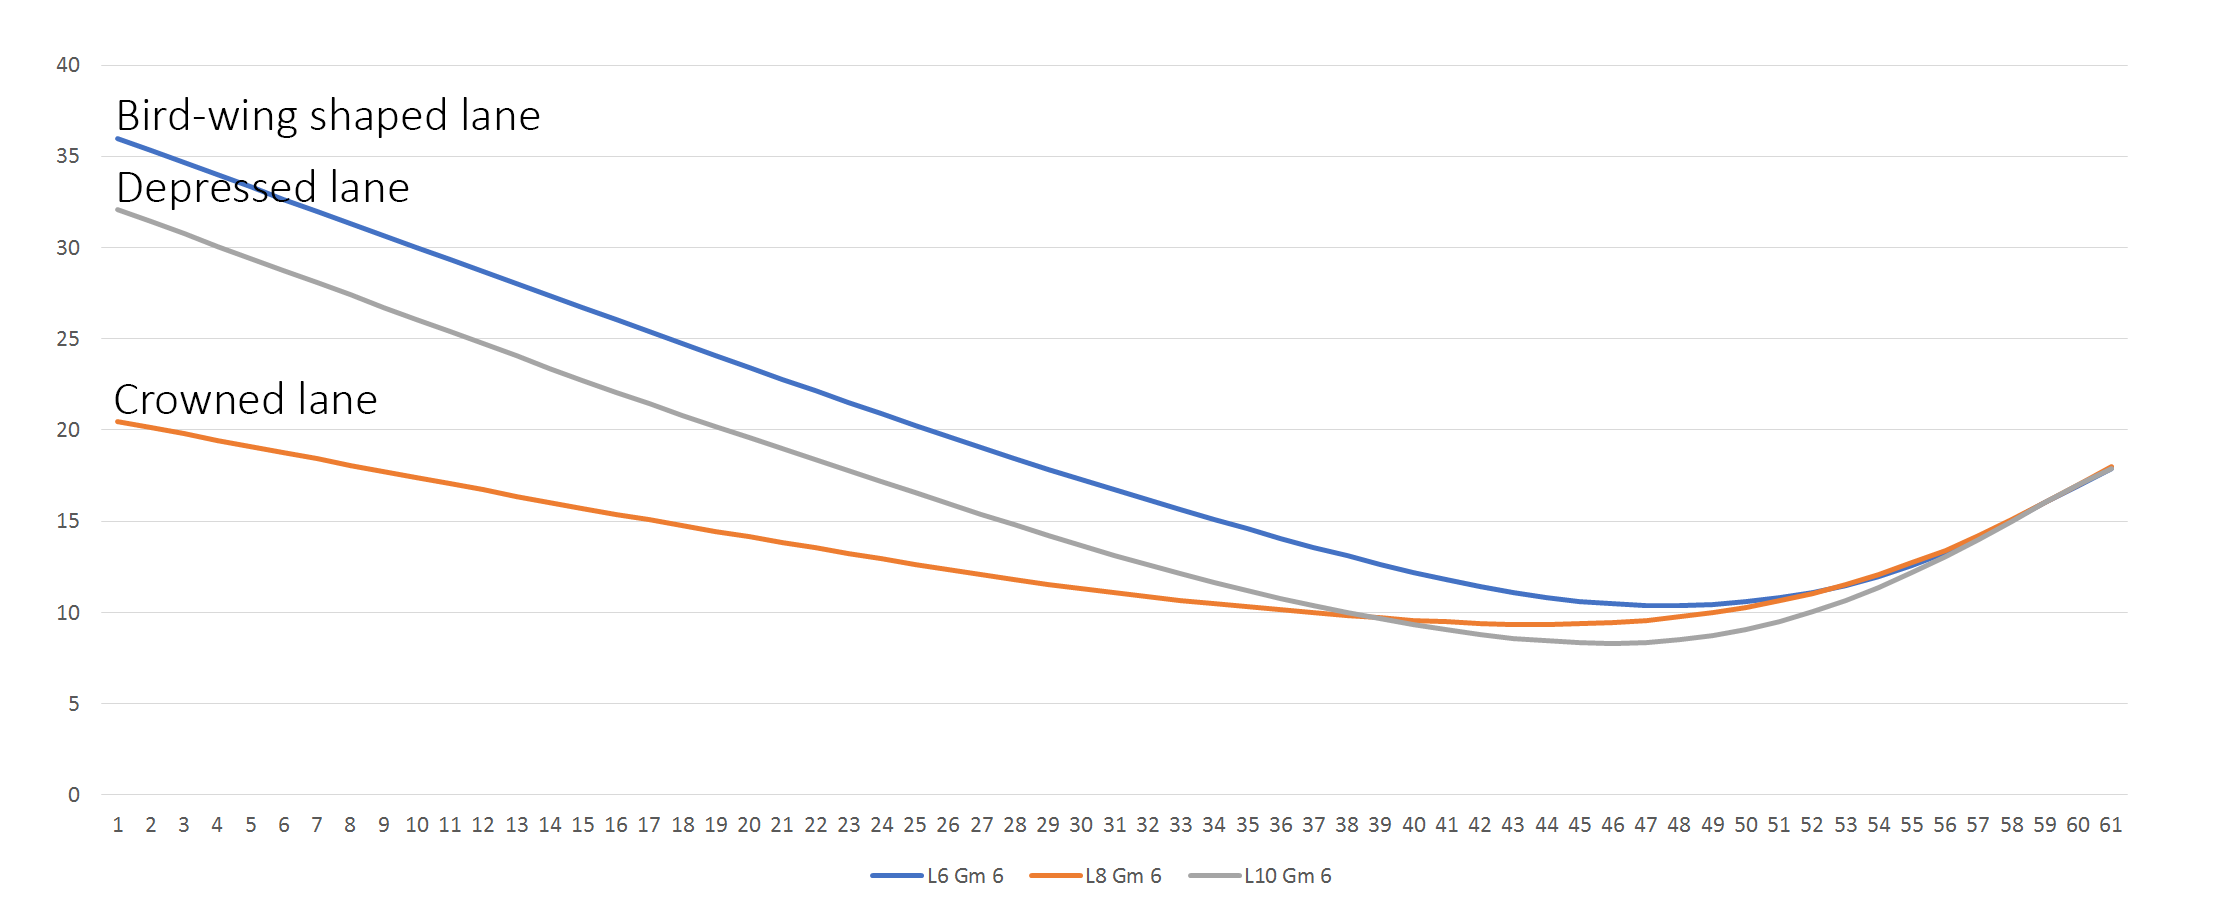
Specto showing the average right-handed ball paths during game six of all three lane shapes
Just like the depletion data showed, the players were most inside on the bird-wing shaped lanes in order to stay away from the hang area and to control the pocket. On the depressed lanes they had more “free hook” so they could swing the ball out farther. And on the crowned lanes, they didn't have to move deep inside so they stayed to the right much farther and played a tighter line.
So there we have it – the same oil pattern, applied at the same time with the same lane machine, using the same oil and cleaner, on the same lane surface, with the same bowlers, but three different lane shapes causing that oil pattern to play different, and break down significantly different.
Topography has been a buzz word for a few years now and we’re really seeing how influential it is, and how it affects lane play. For instance, want to know which part of the lane your ball is influenced by topography the most? Or how different ball rolls are affected by these slopes on the lane surface?
We’ve watched enough over the years to make some conclusions which are not only backed up by results but by physics. Stay tuned, the answers will be enlightening…
5 Must Know Things about Oil Pattern Taper
Oil pattern taper, the amount of lane conditioner in the front part of an oil pattern versus how much is at the end of the oil pattern, has had to change significantly as bowling ball technology has changed. Lane conditioner (lane oil) has two main functions; to protect the lane surface, and to provide smooth predictable ball motion for as many styles as possible.
1 - History
When bowling balls were balanced, the rotation of the bowling ball was very stable and there was essentially one oil ring on the surface of the ball. Front-to-back oil taper with balanced balls is very different than what is needed with modern high flaring balls, which have multiple oil rings on them.
Remember, with high flaring balls, the oil pattern breaks down from back to front and with low flaring balls it’s the opposite, oil patterns break down from front to back. As a refresher, here is an article on that explains how oil patterns breakdown differently between the two types of bowling balls: Breakdown and Carrydown – Then and Now.
At the same time that bowling balls were going through changes, lane surfaces were also changing – “it’s very hard to hit a moving target” was something John Davis used to say often when referring to the art of lane conditioning.
As we have shown often in seminars and online articles, regularly maintained wood bowling lanes are the most consistent type of lane surfaces from lane-to-lane, and bowling center to bowling center. There may be some lengthwise level differences from center to center, but the overwhelming majority of wood lanes were cut with a slight depression, which allowed statements like “the oil pattern taper should be 3:1” to be more valid.
With synthetic lanes however, lane shapes are all over the map, and blanket statements about front-to-back taper, or any oil pattern statement for that matter, can often do more harm than good for people trying to find the best solution for their bowling center.
In measuring hundreds of bowling centers around the world with the Kegel LaneMapper we have found the lanes in any one center follow the same trend as it relates to lengthwise levelness. The only exception to that rule is when bowling centers have added sections of lanes over time.
So if we simply talk about oil pattern taper as it relates to the lengthwise level of a bowling lane, if a lane went downhill we could easily increase the front-to-back taper ratio to help the ball slow down to achieve “good ball motion”. Conversely, if the lanes in a bowling center predominantly go uphill, we might decrease the taper of the oil pattern so the ball would slow down less in order to provide good ball motion for the majority of bowlers.
When lanes were made of wood and resurfaced often, and bowling balls were essentially balanced, it was that simple – but not today.
Today’s synthetic lanes can be crowned, they can be depressed, they can be depressed up front and crowned down lane or the opposite, they can be high right, high left, and anything in between. We very often have seen synthetic lanes that are shaped like a seagull wing; crowned outside and depressed in the middle.
Add the fact that your customers have bowling balls that are still balanced (low flaring) to the very unbalanced kind (high flaring), providing that perfect front-to-back taper can be a challenge.
Of course your daily house pattern is most important for your center, and getting that one pattern “right” can be accomplished, but applying a tournament pattern, or one of the many named patterns out there, and having players expecting it to play similar from center to center is like expecting to win the lottery.
2 - House Shot Patterns (Recreational Type)
Most daily patterns used in bowling centers around the world are of the easy variety – a lot of conditioner in the middle and not much outside. For these type oil patterns, it is most important to control the amount in the mid lane and at the very end of the pattern to 1, minimize carrydown and 2, to open up the outside portion of the lane.
The graphic below is of a typical oil pattern taper when only non-flaring balls were in use. The goal then was to protect and apply conditioner only in the head area and let the conditioner “bleed off” the oil transfer system the rest of the way down the lane to the end of the oil pattern. From 8’ to the end of the pattern was typically a front-to-back taper ratio of 3-4 to 1 and that was with a maximum of 20 units in the head area!
Today’s oil patterns with today’s high flaring balls require a different type of taper, and much more volume. If we start with 80 plus units in the heads, there might still be 50 plus units in the middle to the 30 foot range. We do this in order to provide the bowler with a lot of hold area and decent ball motion, along with providing durability to protect the lane as long as possible.
To get that amount of oil throughout the pattern, the buffer brush must be loaded much more throughout the oil pattern with possibly a much more drastic drop off of conditioner towards the end part of the pattern. The amount towards the end of the pattern should decrease at a rate according to the type of lane conditioner in use and/or lane topography.
Below is an example of a typical daily oil pattern taper using high flaring bowling balls. As you can see, much more conditioner is used throughout the entire pattern.
The outside portion of the pattern has very little conditioner because most centers want to provide the bowler with a lot of mistake area outside of target. So even though we may want some taper there to allow the straighter player to start more to the right, most are concerned about not having too much conditioner towards the outside area in order to provide the largest margin for error possible.
3 - Challenge and Sport Oil Patterns (Competitive)
When designing competitive oil patterns, the goals of a specific oil pattern can vary greatly. If the pattern must play good on the fresh, because of a match-play format for example, finding that perfect taper for game one might be in order. That type pattern will usually be a higher front-to-back taper ratio in order to get the ball to read the lane sooner within the oil pattern.
If the goal is for the pattern to keep players in a specific zone for a longer time, front-to-back taper might not be as important as making sure the end of the pattern holds up for more games. That type of pattern would most likely have much less taper and play more difficult on the fresh, and then become easier as depletion towards the mid and end part of the oil pattern occurs.
A perfect example of an oil pattern with very little front-to-back taper is the 2015 US Open pattern that was used in Garland Texas. The amount of oil in the middle at 8’ on this pattern proved to be in the high 50 unit range, at 22' in the mid 60 unit range, and at 2’ before the end of the oil pattern (41') was in the mid 30 unit range. The front-to-back taper in the middle of that oil pattern was about 1.75 to 1 from 8' to 41', and 2 to 1 from 22' to 41'.
Below are two graphics of the 2015 US Open oil pattern – the 3D and 2D graphs. Lane tapes were taken at 8, 14’, 22’, 27’, 32’, 36’, and 41’.

The pattern goal of that event was to try and keep the players from lofting the gutter, which was accomplished, but we cannot discount what was done with topography at that venue as well. Our studies show topography is always a factor in how oil pattern plays, develops, and breaks down. In this case, the USBC made topography public so we know lane topography definitely was an additional reason the pattern held up so well. (The why will be a future article!)
4 - Lane Conditioners
The lane conditioner you choose also must be factored into your oil pattern’s design. Lane conditioners are developed with specific characteristics and your oil pattern should complement those characteristics in order to benefit from them.
For instance; FIRE and ICE were created for increased durability and both require less conditioner at the very end of the pattern than many of our previous conditioners. If there is too much conditioner at the end of the oil pattern the ball will read the carrydown much more than if, for example, the same amount of Prodigy was at the end of the pattern.
If using our newest lane conditioner, Curve, more conditioner can be applied at the end of the oil pattern simply because it’s a higher friction conditioner, and that will help the ball slow down. Also, the ball won’t “see” what is carried down beyond the oil pattern as much as it would with FIRE or ICE. The trade-off however is durability.
5 - Topography
Now that we have those other factors covered, we can touch base on topography some more and how lane shape affects oil patterns. As we touched base earlier, wood lanes have very similar topography; all are slightly depressed (lower in the middle than the outsides) with the main differences from center to center in lengthwise levelness.
Yes we have more wear issues with wood lanes, which can be corrected with a resurfacing or re-coating, but with synthetic lanes we have more diverse shapes on the lane than ever before in the modern history of the game. Those shapes can vary from lane to lane, and even within the same lane. This makes finding that perfect oil pattern on synthetic lanes across any one bowling center more challenging than ever.
For lanes that are predominantly crowned, lowering the amount of conditioner in the mid lane and at the end of the pattern will help the ball lose energy at the proper rate, which will help provide truer ball motion. Crown lanes tend to act like lanes that go downhill, so anything you can do to help the ball slow down will help your bowlers with good ball motion.
For lanes that are severely depressed, and if you wish your bowlers to play right of center, additional conditioner in the mid lane and at the end of the oil pattern helps reduce friction slightly, and therefore helps the ball not lose energy as quick. Think of depressed lane like a banked curve on a race track – the inside part of the lane is lower than the outside part of the lane so the ball is rotating up the hill causing it to use energy quicker, along with normal force helping the ball move more to center.
For seagull wing shaped lanes, and believe us when we say there are many overlays like this, shorter patterns will need increased front-to-back taper in order to get the ball to read the lane earlier. Yet longer patterns on this lane shape will need less taper simply because from 10-10 the lane is depressed - once the ball gets towards the middle and end part of the pattern it sees the lane more, and sooner, as the oil depletes.
Conclusion
In the article titled Breakdown and Carrydown - By The Numbers, we showed how today the front part of the lane never really depletes to the point of excessive friction unless there is a major wear issue – it’s the mid lane and backend that deplete to the point of the ball seeing a great amount of friction.
Sure the front part of the pattern depletes, but if we start with 70-100 units up front, or less like in the US Open example, at the end of play there is still 30 to 40 plus units of conditioner in the front part of the lane, which is plenty to provide a low amount of friction.
In addition, that part of the lane the bowling ball has the least amount revolutions and the most amount of speed - both of those attributes make the ball “see the lane less” than it does at it slows down and revolutions increase.
The point is, front-to-back taper ratios with today’s patterns is not as important as controlling the amount of conditioner in the mid lane and at very end of the pattern.
If you get that correct in your center, the majority of bowlers in your center will have predictable and controllable ball motion, and back end change (carry down) will be minimal. And for the most part, hopefully, you will have happy bowlers.