
Entry Angle Assessment
Originally published in Bowling This Month - February 2016
In modern bowling, a player’s success depends on the implementation of numerous components: throw execution, ability to measure the characteristics of ball motion, mental and psychological preparedness, and much more. In this article, I want to share my experience in teaching the skill of determining the bowling ball’s entry angle. Mastering this skill allows the player to quantitatively assess one of the major characteristics of ball motion and enables deliberate correction of numerous game components.
In this skill, as well as the line-of-sight construction skill (described in my previous article), visual and spatial thinking are critical. We have to pay the most attention to these types of thinking when learning and using both line-of-sight construction and entry angle assessment skills. When testing players at different levels, most players, including advanced ones, could not determine the value of their ball’s entry angle. In the majority of cases, they could provide only a simple and ambiguous description, such as small, large, insufficient, bad, too much, etc.
This is not surprising, since very few players have had the opportunity to assess this parameter using the currently-available technical feedback systems that provide entry angle data (such as CATS and others). In practice, the skill of entry angle determination is almost always developed over many years of training and long tournament practice. On the other hand, applying the training methods described below, it is possible to obtain improved results in significantly less time, wherein players, using their spatial and visual thinking and memory, are able to determine the entry angle quantitatively using a range from 3 to 6 degrees.
When we evaluate trajectory accuracy characteristics, the lane markings (counting of boards and/or targets) allow us to see and quantitatively assess the ball’s lateral position in different parts of the lane (target area, breakpoint area, position of the ball at pin contact, etc.). This allows us to literally name the number of a board on which the ball is positioned at any given point along its trajectory. For example, when we need to draw the line-of-sight, we can use readily visible marks, such as targets, pins, dots, etc. In contrast, it is difficult to determine the entry angle on the lane due to the absence of readily visible and memorable orienting points.
Laser line projection
To overcome this lack of orienting points, the student first and foremost needs to be shown the image of the entry angle line on the lane and how the entry angle is determined. For this purpose, a special line laser can be used to “draw” the entry angle line on the lane.
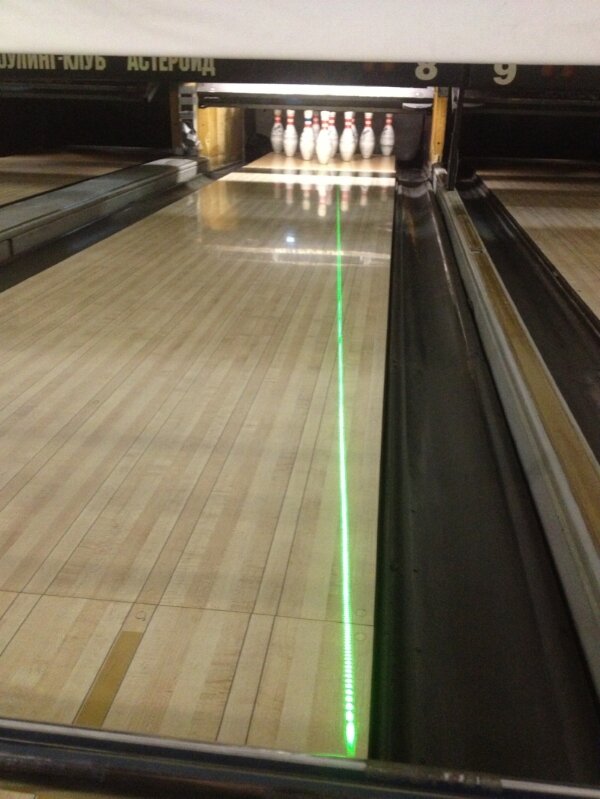
An entry angle line of 5 degrees “drawn” onto the lane with a green line laser.
During the initial training phase, it is important that the student does not focus on the entry angle value. It is most important for the student to see the image of the entry angle line on the lane and memorize that image. A good starting point is to mark the angle at 4 degrees and ask the player how the entry angle of his throw differed from the visible one on the lane.
A powerful memorization technique is for the coach to quickly move the visible entry angle line to reflect the characteristics of the specific player’s throw in order for the ball to pass along the visible line as often as possible. Thus, the player will quickly learn to determine the presence or absence of ball roll as well as the length of the ball roll. This is a very important and useful intermediate skill!
Editor’s note
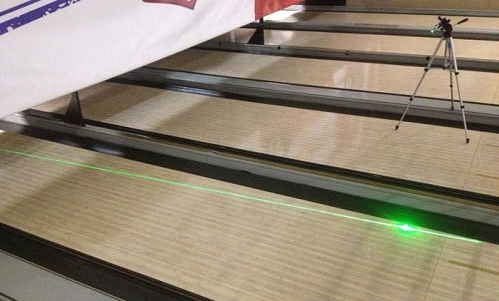
Laser setup example
The laser line in the above image was generated using a standard off-the-shelf 350 mW green laser pointer in conjunction with an off-the-shelf line lens kit, with the laser mounted on a tripod, as shown.
Please be advised that lasers can be dangerous. A 350 mW laser is a Class 3B laser device which can cause harm if used improperly. Among other risks, never look directly into the beam of a laser and never point a laser beam at a person. Never use a laser unless you are properly trained and understand all the possible risks. Also, please keep in mind that the sale and use of lasers can sometimes be subject to government regulations.
It doesn’t take long for the student to memorize the entry angle image when using a bright and memorable laser line. Once the player fully understands these concepts, the next step is to learn how this line ties into a coordinate system which provides the framework to make the necessary quantitative assessment to determine the angle value correctly in the absence of the laser line. There are two very helpful methods for this purpose.
Intervals
The first one is the method of intervals. With this method, the player is taught to quickly analyze and determine various lengths on the lane correctly. In principle, this skill is very important for understating ball reaction.
The goal is for the student to memorize the most important intervals on a lane, including 30 feet, 35 feet, 40 feet, 45 feet, and 50 feet. We approach this task by placing memorable marks, such as paper taped in the gutter, at the desired length or lengths.
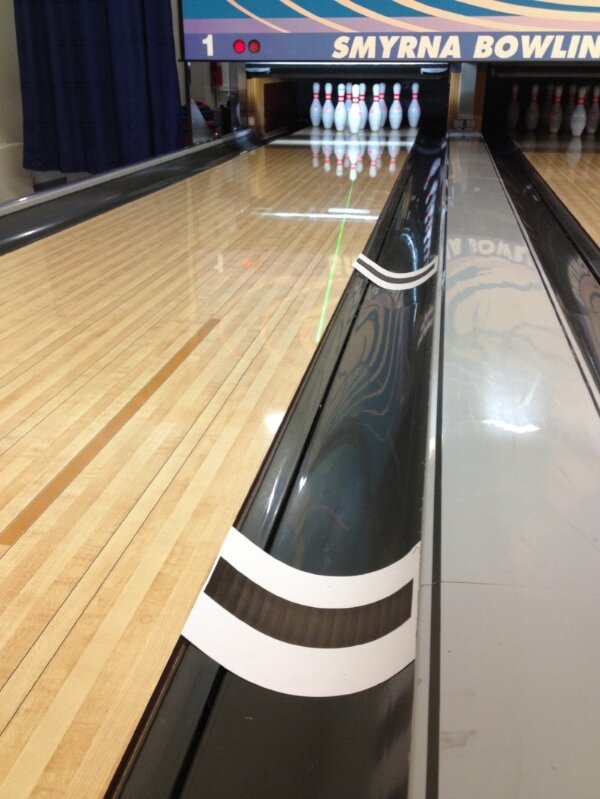
An example of using paper markers in the gutter to show the location of specific distances.
An example of using paper markers in the gutter to show the location of specific distance. Of course, this is assuming that the player understands basic lane geometry (such as the width of lane, the distance to the targets and pins, etc.), since memorizing the desired unmarked points requires that the student use all available visual cues. For instance, the 1st pin (at 60 feet) has a reflection that can either correspond to or be very close to one of the desired intervals (50 feet for a taller person, down to 45 feet for a shorter person). Determine what interval the bowler sees and use it.
It is important to understand that the intervals are determined by the individual’s unique characteristics, since they are connected with the player’s height and the height of his eyes in the initial and finish positions. To begin with, focus on memorizing the required intervals from the player’s finish position, as it is critical to choose a consistent and repeatable position from which to memorize visual cues. Moreover, this is yet another argument for the benefit of a stable and proper finish position. Obtaining visual information after releasing the ball from the foul line is facilitated by correct and consistent technical execution.
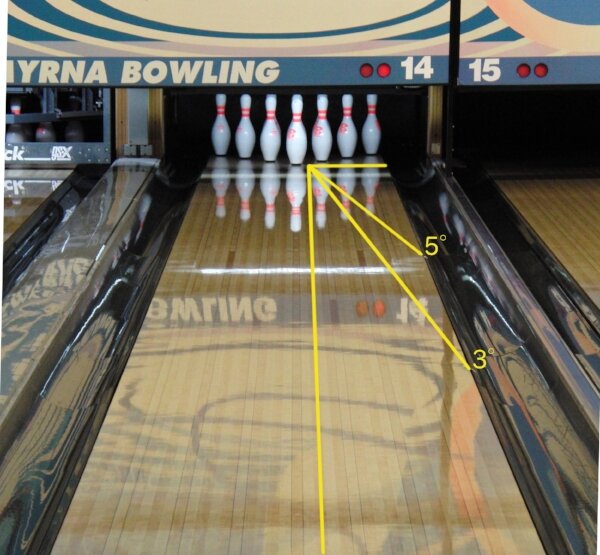
For entry angle determination, memorizing just the two lengths of 30 feet (half the distance from the foul line to the first pin – 1/2 of the lane) and 45 feet (half the distance from the 30 feet mark to the first pin – 3/4 of the lane) is enough. It is easiest to start by memorizing the 30 feet mark and then later adding the 45 feet mark. Once the student has memorized these intervals, the next training session can focus on learning how these lengths relate to the two entry angles of 3 degrees and 5 degrees.
Ideally, using two laser lines, the coach should indicate the 3 degree line extending from 31 feet to the pocket and the 5 degree line from 42.5 feet to the pocket. Remembering the memorized visual cues for 30 and 45 feet, the student can simply add 1 foot for the 3 degree line and subtract 2.5 feet for the 5 degree line in order to commit these angles to memory.
In order to achieve different entry angles, balls and throw execution parameters (speed of throw, axis tilt, ball trajectory, etc.) can be changed. The table below shows the entry angle which corresponds to the given length of the lane edge from the foul line.
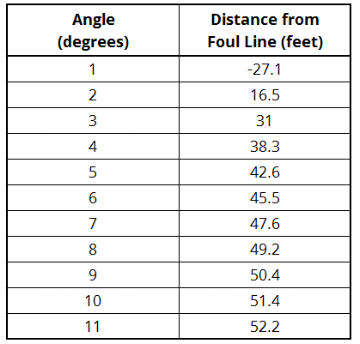
Angle vs. distance for a line drawn from the gutter edge to the pocket.
At this point, the student has learned a significant and complex skill set: a practical understanding of the detailed range of his ball arsenal and the effect of changing throw characteristics on the ball trajectory.
The use of a device for marking the aiming line, described in my previous article, in combination with marking the entry angle line(s), is an efficient technique for teaching the player to consolidate these skills.
Retinal angle assessment
For further consolidation of this newly acquired skill, there is another approach to memorizing the entry angles that a player sees. Have you ever asked a beginning student or spectator about the entry angle value they perceive? The answer is consistently 45 degrees. This is accurate if the angle is assessed as obtained by the retina at the foul line. It matches the angle measured on video or photos.
A bowler’s perception of entry angle is typically very large (shown from a height of 4.5 feet at the foul line).
Retinal angle assessment can be used to obtain the true angle. In order to do this, the coach must determine the characteristics of the player that will influence their perception of the entry angle. The table below shows the height of the player’s eyes at the finish position which corresponds to their perception of 3 degrees and 5 degrees.
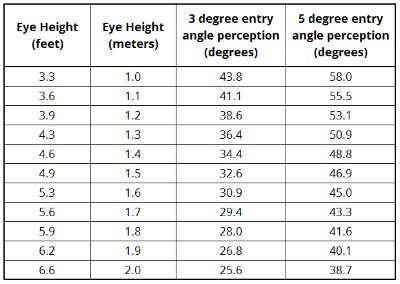
Entry angle perception (retinal angle) from the bowler’s perspective vs. height.
In applying this assessment method, the difference between these two angles (3 degrees and 5 degrees) as viewed by the bowler is approximately 15 degrees. For example, if the height of the eye is 1.6 meters (5.3 feet), the angle of 3 degrees is perceived as 31 degrees and the angle of 5 degrees as 45 degrees. These angles are fairly easy to remember. Simply measure the height of the player’s eyes at the finish position and print the respective angles for memorization.
Finally, once the player has fully understood the entry angles of 3 degrees and 5 degrees, he can extrapolate from there to additional angles. For instance, knowing 3 degrees and 5 degrees, the player can easily see when the ball’s trajectory is between these memorized points and determine the angle to be 4 degrees. Equally an angle less than 3 degrees would be 2 degrees or slightly more than 5 degrees is 6 degrees. The ability of the player to determine the range of angles helps him assess the situation on the lane and ultimately provides the tools to consistently obtain the ideal entry angle during competition.