
How can a simple water filter become so clogged?
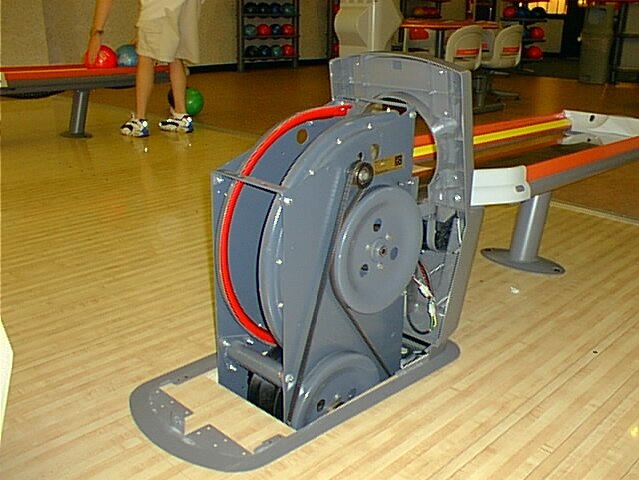
Anyone that maintains lane machines knows how critical routine maintenance is. But one item that often gets overlooked in lane machine upkeep are supply tank filters - the filters in the oil supply tank, filters in the cleaner supply tank, and now with the FLEX lane machine, the water supply tank filter (see help video below). In this feature article of the Inside Line, we’ll focus on the water supply tank and how those filters can become clogged over time, even though it’s "just water".
Most people are aware that all water is not created equal. Water can be hard or soft, and have different levels of calcium, phosphates, nitrates, sodium, potassium, and chloride, along with some uninvited guests depending on the water treatment plants. These substances are known as Total Dissolved Solids (TDS).
TDS is a measure of the “combined content of all inorganic and organic substances contained in a liquid in molecular, ionized, or micro-granular suspended form.” In layman’s terms, TDS is a measure of the amount of the stuff in the water you can’t see.
Knowing the TDS is all well and good but, how will this affect your lane machine filter?
Well, when water sits around, you know that mold and fungus can grow on the water’s surface. The water can become very pungent; you can actually see things growing and the water color changing. Think about bird baths and small fountains that don’t have running water; the stagnant water eventually turns rancid from mold and fungus growth.
When water sits in a container for long periods of time, a bio-film will eventually begin to form. Bio-films form on surfaces like tank walls and filters. Actually, they will form on virtually every non-shedding surface in a non-sterile or very humid environment.
On your teeth, plaque is a bio-film. In your cooling and heating system, bio-film forms reducing the effectiveness of the system. The slimy stuff you see on rocks and pebbles in streams is bio-film. In stagnant pools of water, bio-films can form on the surface.
Basically, a bio-film can form just about anywhere as long as there is a place for the cells to attach; the cells can attach to a solid surface or to each other.
So bio-films form in water, right? Well, why don’t bio-films form in bottled water at the grocery store?
Bottled water is packaged to prevent bio-films from forming. The bottled water you buy from the store is packaged under nitrogen pressure to force out the air. This prevents bio-films from forming in the water while it sits on the shelf. Once the bottle is opened and air is introduced to the system, the bio-film can begin forming. This is one reason why you shouldn’t reuse bottles from bottled water without thoroughly cleaning them.
Bio-film goes through five stages of development:
1. Initial attachment,
2. Irreversible attachment,
3. Maturation I,
4. Maturation II,
5. Dispersion.
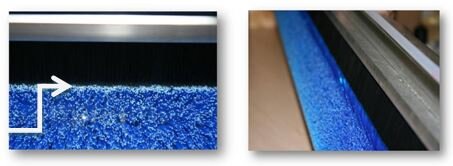
The picture below shows how a bio-film develops through each of the different stages.
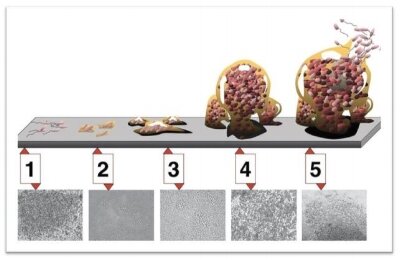
Five stages of bio-film development
Water quality in a specific location will dictate how fast a bowling center will have bio-film develop. TDS and the specific treatment methods used at the local water treatment facilities will change the water quality. Eventually though, every center will have to clean and/or replace their lane machine water filter at some time.
Just like your coffee maker at home, the water filter and supply tank should be cleaned periodically to prevent the problem. If you never clean your coffee maker, eventually the pump will fail. If you never clean your water supply tank in your single cup machines, a bio-film can form in the water tank.
At Kegel, we recommend removing and cleaning the water supply tank filter once a month. We also suggest flushing out the water supply tank at least every couple months, no matter how often you use your lane machine. The water is sitting in the supply tank the same amount of time no matter how many lanes you are doing a day – always.
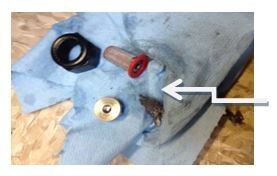
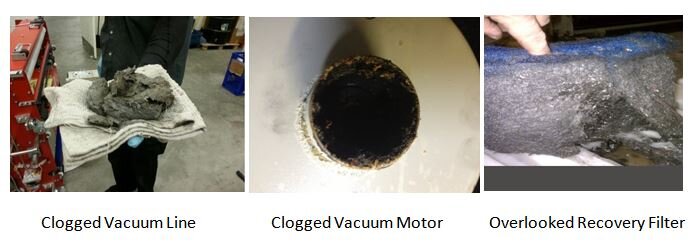
This is what happens when filters are not maintained regularly:
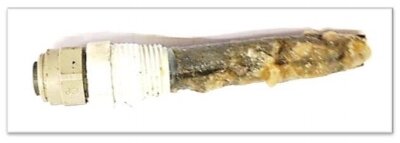
A filter that has not been maintained.
If periodic maintenance is not being performed on a simple item like your water supply tank and filter, or any filter for that matter, the liquid in the tank will not flow properly and that will change your dilution ratios. We know changing dilution ratios will change ball motion. But, improper cleaning can also lead to a host of other issues.
Just like Sanction Technology has done for the oil system with process verification, with Kegel’s sprayless cleaner system it's easy to check volume output for water and cleaner. As we always say, “it’s better to know than to hope”, and as any lane person will tell you, it's also better for you to find any issues before your bowlers do.

Does lane oil evaporate and how long should the oil pattern sit?
When it comes to lane conditions, every person has their own ideas as to what they think works best. Mechanics, proprietors, and bowlers all have a difference of opinion when it comes to dressing the lanes. Ask 100 different people and you’re likely to get 100 different answers. In bowling, it’s one of those topics that just seems to create a lot of controversy and a lot of differences in opinions.
Because of all these different opinions, we get many questions regarding what the best methods are for ensuring lanes are the same from day to day. Some of these questions stem from curiosity while others, like the one I got last month, stem from bowler controversy.
I was forwarded a message that came in from our website. The proprietor was quite frustrated at his bowlers because his bowlers felt like the lanes were getting conditioned too early and the conditioner was “drying up” before they ever started bowling. The proprietor tried to show the bowlers statisitical data in their score trends that suggested otherwise. But, the bowlers just didn’t agree. So, he asked “the experts”; how long can an oil pattern sit on a lane before it starts to deteriorate?
Modern lane conditioners; every lane conditioner available in today’s market; are all mineral oil based. Kegel uses pharmaceutical grade mineral oil in our lane conditioners so it is of the highest purity available. Mineral oil itself doesn’t evaporate. You could fill a cup with mineral oil and leave it sitting and it wouldn’t evaporate. Here is a link to a safety data sheet (SDS) for white mineral oil. If you look in section 9 (page 4 of the document), it shows the evaporation rate as ‘NA’. This means there is negligible or no evaporation of the material.
There are some chemicals in lane conditioners that will evaporate but these ingredients are minor compared to the percentage of mineral oil. For example, solvents such as isopropyl alcohol (IPA) are often used as an inexpensive way to lower the surface tension. Lowering the surface tension will allow the lane conditioner to wet across the lane surface more quickly. Once the lane conditioner is applied, the IPA would evaporate over time. Since lane conditioners are applied in such a thin film with a low volume over a larger area, we would estimate this to be in the 30 minute range at most. It does not take a lot of IPA to lower the surface tension so it is used in amounts of 1% or less. This evaporation does not affect the lane play characteristics that come from the mineral oil and the other ingredients that are used to give the conditioner its characteristics.
While we’ve never tested the theory of how long a lane conditioner could sit before deterioration begins, a lane pattern could sit, well, forever without deteriorating. That is, of course, in theory since we don’t have a time machine! There are other things; environmental and atmospheric conditions; that will affect lane conditions. But, the conditioner itself could sit for days on the lane and it would still be there; it isn’t going to evaporate away.
While we haven’t tested the ‘forever’ theory, we have allowed a freshly conditioned lane to sit for 24 hours. We took tapes from the freshly applied pattern and took tapes on the same pattern 24 hours later. The results: the tapes were exactly the same for both sit times. The conditioner sitting on the lane didn’t change as a result of evaporation.
Other things can affect the conditioners performance though. Dust from the air or from AC vents can be deposited on the lane. These particles can greatly affect the playing characteristics of the pattern. This is one reason that a good cleaning routine is so important. Applying lane conditioner to a dirty lane will also affect the playing characteristics of the pattern.
Atmospheric conditions like temperature and humidity will also greatly affect lane play and these are more likely the cause of changing lane conditions. Bowling centers see this a lot as the weather changes, especially when there are sharp changes from cold to hot or hot to cold. Bowlers will complain that the lanes are tighter or drier or something else but they don’t always consider the weather changes and that can affect lane conditions significantly.
Here are two previous Inside Line articles that address changing weather and lane conditions: The Weather’s Changing… Are Your Lane Conditions? and Lane Conditions and Cold Snaps.
How long a conditioner should be allowed to sit on a lane prior to bowling is a very common question. And, it’s one that we’ve gotten many times. While consistency is key, we like to support our arguments with science. So, here’s a little science behind conditioner application.
When lane conditioner is immediately applied to a bowling lane, several things must happen before the lane conditioner stabilizes enough to provide consistent playing characteristics. One is allowing the lane conditioner to adhere to the lane surface. This takes about 15-30 minutes depending on the amount of conditioner applied, the type of conditioner, the type of cleaner being used, and the surface energy of a particular lane surface.
The surface tension of the conditioner is also important since the surface tension directly affects how the conditioner “wets” across the lane. The conditioner needs to “like” the lane in order for it to wet across. If the surface energies between the two don’t agree, the conditioner will “sit up” on the lane surface (think of this effect as little beads of water sitting on the surface of your car versus the water sheeting off the surface of the car).
Another bonding takes place within the lane conditioner molecules themselves. These bonding forces, known as van der Waals forces, are basically weak attractions between atoms, molecules, and surfaces. The time for this to take place after conditioning a bowling lane is also anywhere from 15-30 minutes. The below video shows these weak bon
With the amount of lane conditioner being used in today's lane patterns, it takes about 15-30 minutes for the lane conditioner to "settle down" and stabilize on the lane. If time is not allowed for this process to take place, things like excessive carrydown can occur. The lanes may also play "tighter" simply because the oil is sitting up on top of the lane more and there is less resistance to the bowling ball as it rolls through the oil pattern. This is one reason; during tournaments where we provide lane maintenance; we always try to get the tournament organizers to allow a minimum of 15 minutes of lane conditioner "sit time" before the first ball is thrown down the lane.
The biggest key is consistency. It’s one of the things that we preach. Create a routine and stick with that routine every day. If you do the lanes an hour before league, do them an hour before league every time and you’ll eliminate that variable (and that complaint from your bowlers).
We hope this information helps you. If you have additional questions, please feel free to contact us. We will be happy to assist in any way we can. Until next time, happy bowling!
Getting your Pinsetter Ready for the New Season
Maintenance to your pinsetter is important to keep your center running smoothly. In this article, we will discuss some commonly overlooked maintenance items and some tips to help you prepare for your winter season.
Pin Damage
Sometimes pin damage can be easily explained as in the examples below, but some can be much more troublesome to find. Small marks and scratches can accumulate so slowly over a period of time that irreversible damage sneaks up on you and can handicap the appearance, as well as the performance, of the pin.
QUICK TIP: Before you install a full set of new pins for the Fall Leagues, first start with installing one single pin in each pinsetter and run for a shift. Remove the new pin and examine it. If there is any damage, remove the pin and tag the machine for a more in depth inspection.
Usually if pins are getting damaged and showing marks, you can locate the problem area by the evidence of pin chips or shavings. Loose or broken parts tend to scratch the pins, so inspecting all pin delivery paths should lead you to the problem.
Common Problems:
-Pin deck area - Screws, flat gutters, edge boards, and kickback plates
-Broken turret wires and missing deck rollers (A-2)
-Misadjusted turret wires can lead to damage from pulley or center chute (A-2)
-Broken or loose parts on the bin assembly (AMF)
-Missing ball wheel guards (A-2)
-Cracked plows (AMF)
These are just a few examples, but the most important thing to remember is that your problems should be fixed immediately before you risk damaging a new set of pins.
Ball Lifts - See what you can “uncover” before Leagues start!
Ball lifts can easily become overlooked throughout the season since they are an efficient piece of equipment. They run pretty much trouble free so the old saying, “Out of sight, Out of mind!” fits here. Simply doing a quick cleaning and inspection can eliminate the chance of unexpected downtime or ball damage.
Inspection:
-Make sure the lift turns on properly when either pinsetter is powered up
-Inspect belt and belt tracking
-Inspect ball lift tires
-Listen for any unwanted noises
-Check for loose hardware
After the ball lift is cleaned, insert two balls in the trap doors, push them into the lift, and watch the transition through the lift. The balls should move up freely with no belt slippage.
Secondly, with the lift off, take a single ball and manually rotate the top pulley to feed the ball through the lift. The ball should transition through the contact points of the two tires and C track smoothly. If you get binding or slipping spots through the transition, you may need to look at your upper and lower tire configuration.
There are several different kinds of tires and each of these have their own characteristics. Mixing and matching tires in a lift can also create different transition characteristics, so find a combination that works well for your center. Smooth consistent transition is the goal here. A binding lift can cause premature belt wear and may also lead to too much motor strain and amp draw, eventually causing the relays to fail.
By performing regular maintenance and catching problems early, you can help keep your center running at its top performance.
Learn about Kegel Pinsetter Parts
Switching Lane Conditioners: Out with the old, in with the new!
Bowl Expo has come and gone once again. That means that summer is in full swing and league season will be upon us before you know it. As such, you may be thinking about trying a new lane conditioner, like Fire or Ice, before league season starts. These conditioners were released last year and they have been gaining attention because of their performance in tournaments and championships worldwide. Now is the perfect time to try one and get your pattern adjusted to be ready for fall.
Changing lane conditioners can be an overwhelming process. In fact, just the thought of it may send shivers down your spine. After all, if your bowlers have been happy, why change it and risk upsetting the balance? Well, technology has come a long way. We’ve worked hard developing conditioners that will help you protect your lane surface while providing a durable lane condition for your bowlers. And, we’ve improved the durability while allowing you to use less conditioner which saves you money.
Once you’ve decided to make the leap (and decided which conditioner to use – we’ll have more on that later), you’ll need to spend some time cleaning your lane machine. While it may seem easy to just empty the conditioner tank and pour in the new conditioner, you won’t be doing yourself any favors by doing this. Cross contamination from one conditioner to another in the same tank can wreak havoc on your lane pattern and make your lanes inconsistent. And that just leads to unhappy bowlers. No one wants that!
Additionally, some lane conditioners just don’t mix well with others.* This can cause things like clogged tubing, pencil tips, or even oil control valves. You can avoid a lot of headaches by taking some extra steps early on.
*The FLEX Lane Machine boasts the ability for centers to use two compatible conditioners simultaneously. Currently, Fire and Ice are the only compatible conditioners that can be used in this manner. Mixing other conditioners, such as Prodigy or Infinity, with Fire or Ice is not recommended.
Changing conditioners in the machine is a tedious process, but it is a process that is well worth it. Here is a brief overview of the process for Sanction Technology™ lane machines:
Remove the conditioner tank from the lane machine. Empty the contents of the tank into a waste container.
Use some lane cleaner to clean the conditioner tank. Add some of your lane cleaner solution directly to the tank. Swirl or shake the cleaner to get it all over the inside of the tank.
Rinse the tank with water. You’ll want to shake and swirl to be sure the tank gets completely clean. Continue rinsing until the water is clear (it will probably look milky at first) and there is no foam.
Rinse the tank with some acetone (if available) and let the tank dry. It is best to let the tank dry overnight, but give it as much time as possible. The tank needs to be completely dry before you add new conditioner.
Use this time to wipe down and perform any maintenance to the transfer system. This is also a good time to perform some cleaning and/or maintenance to the buffer brush.
Place the conditioner tank back in the machine.
Now you’re ready to fill the conditioner tank and flush the machine. We’ve detailed the entire process here: Changing Out Conditioners - Sanction Technology
So, I’m ready to fill my machine and flush the lines, but I don’t know which conditioner to use. Don’t worry; we’re here to help!
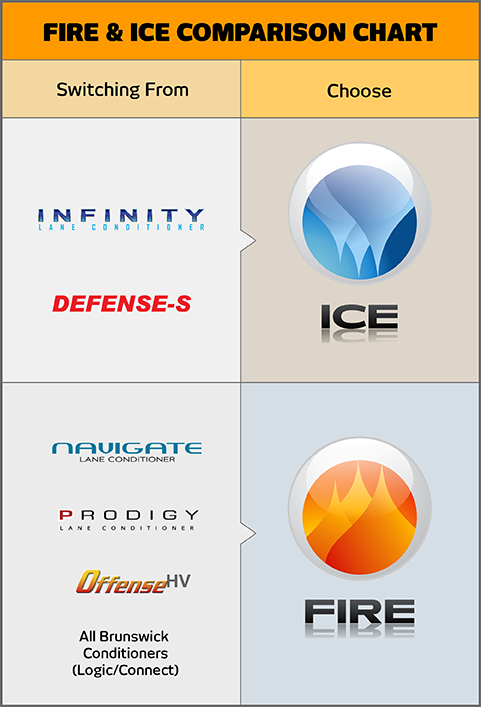
Fire and Ice have similar properties chemically but they yield different results on the lane. Both conditioners are pinsetter and house ball friendly meaning that you’ll have fewer issues in the backend. Both conditioners also have improved durability even with reduced volume.
There are a few factors that can help you decide which would be best for you. What conditioner do you use now? What is your lane surface? Do you have more open play or do you have heavy league and tournament lineage? Answering all of these will help narrow down which option will be best for your situation. Every center is unique, so as always, our Tech Support Team is available to guide you. You can also use the comparison chart below to help in your decision.
Now that you’ve got your new conditioner into your machine and ready to go, we always recommend running your normal pattern and watching ball reaction before adjusting anything. This way you’ll have an apples-to-apples comparison from conditioner to conditioner. It is highly likely, based on our experience with Fire and Ice, that pattern adjustments will be necessary.
To reap the benefits of these conditioners, your pattern should have good front to back taper. If you’re pattern doesn’t have good taper, our Tech Support Team can help you make some adjustments to maximize the performance of these conditioners. If you’re pattern does have good taper, some small adjustments may be all you need to dial in your pattern. Here are some of the common adjustments we’ve seen:
Reduced pattern volume (i.e. 50 ul to 45 ul or 40 ul)
Average pattern volume is 10-20% lower with Ice and 10-15% lower with Fire
Shortened pattern distance and/or reverse buffer drop
Reduction of applied loads
Don’t let the fear of upsetting your bowlers stop you from trying something new. You can reap the benefits of Fire and Ice with a little patience. Start now and you have the rest of the summer to fine-tune before fall leagues. You’ll enjoy the rewards of your hard work and patience when your bowlers are happy with the more durable lane conditions and you have less oil-related backend issues.
Learn more about Fire and Ice Lane Conditioners
Oh No! My pattern is not playing the same as last year!

By Doug Dukes - Kegel Technical Sales Specialist and Kegel Pinsetter Parts
"My pattern is the same as last year but it is not playing the same" is one of the #1 lines we hear this time of year. As one of the techs at Kegel that has the privilege to not only help all of you on the phone, but to also work on lane machines in the field, let’s take a look at some overlooked parts and adjustments to your lane machine.
CLEANING - “You can’t paint the Mona Lisa on a piece of toilet paper.”
The number one overlooked problem on a lane machine is its ability to clean. Anytime a pattern adjustment is requested because they don’t play the same, our first question is “have you done a clean only”.
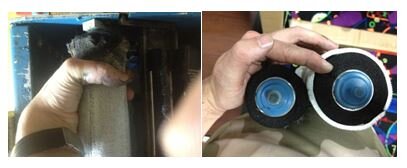
On Spray Jet machines, the screen check valves (153-0220) should be taken out regularly and cleaned. Lint build up on these can wreak havoc on the jet's ability to spray properly and as the check valves get weak, your spray tips can drip. If you notice that your machine is using less cleaner, it may be a good time to take these screens out and clean them. There are also two filters that cleaner passes through before it gets to the screen check valves, one in the tank (154-0212B) and one inline filter before the pump (154-8867A or 154-8887). It is always good to replace these filters every summer.
On Sprayless Cleaning Systems, you need to replace the two filters talked about above, but also your Norprene tubing in your cleaner pump (154-0861B). This style cleaner pump operates by using a set of rollers that press cleaner through this tubing every time the motor turns on. Over time, this tubing can lose its ability to allow cleaner to be pushed through it, and your volumes can be significantly reduced. Many times I have run a cleaner volume check on a lane machine and looked at the touchscreen only to realize that I was the last one to run the test during the yearly service last year!!! You guessed it……the volume was significantly lower than what it should have been.
Once you change the tubing, run a volume check and set it to your desired output and monitor this for a few weeks as the tubing breaks in. It will vary a bit during this time and a readjustment may be required, but it will settle in quickly. This should be checked on a regular basis throughout your season as well.
The cushion roller (153-8838 standard roller and 153-8839 roller with wrap), is another frequently overlooked piece to the cleaning puzzle. The size of the cushion is the key to your cleaning. If we think about how the cushion roller works, when the cloth unwinds, the cushion roller drops onto its stop bolts. When the machine is pushed onto the lane, the cushion actually lifts up off the stop bolts, and the weight of the cushion is what helps clean the lane. Simple right? If your cushion has gotten smaller over time, now it is not making full contact with the lane surface. This means it will not clean well. Mona Lisa and toilet paper soon to follow.
If you look at your cushion roller and see the “alligator skin” look, the ends are flaring out or torn and the cloth is visually pulling into the roller, or if you can wrap your hand completely around it, it is probably time to send it to greener pastures. One trick I show during service stops is releasing the tension on the cushion roller when you finish your lanes.
On machines that have the take up roll on the top, you can stand the machine in the transport position when finished and open the duster compartment. Slide the take up roll to the side and turn it 180 degrees and lock it back in place. This will relieve the pressure on the roller and when you turn the machine on to run lanes the next day, the machine will find “home” and wind the cloth back up for you. This can extend the life of your cushion and save you from headaches mid-season.
Squeegee blades (153-8204E Blue or 153-8834 Brown) normally are not overlooked, but why leave them out. Your squeegees should be flipped every six months, and changed once a year. You don’t want to leave any cleaner behind. Always check for your 1/8 to 3/16 adjustment as well, once you change or flip your blades and adjust accordingly.
Recovery tank filters are another overlooked item in the cleaning process. Waste tank a little lighter than normal? Check your filter and change it regularly. This is the perfect time to flush out your vacuum hoses and check for small pin holes that may affect suction, along with cleaning your vacuum motor and checking the motor brushes.
Conditioning - “The best canvas deserves a worthy brush.”
A few minor adjustments in your transfer system that have been overlooked can also make you pull your hair out when you’re dialing in your pattern.
Have you checked your crush adjustments on your brush? Most people check the crush from the buffer brush to the lane and set their buffers at 1/8 to 3/16. What most people don’t check is the crush to the transfer brush or roller depending on the machine type. If it can’t pick it up off the transfer brush or roller it can’t get it to the lane!
As the brush wears, it may lose some contact with the transfer brush or roller. When getting ready for the fall season with an existing brush, or when putting in a new brush, always check this adjustment. We like to see 1/8 inch of crush to the roller or transfer brush.
On a transfer brush system, if you turn the buffer on while the brush is in the down position, you should see a thin light colored line where the transfer brush and buffer brush meet. This is from the bristles on the buffer brush being pushed together as they push against the transfer brush. Adjust accordingly.
Your pressure gauge can tell you a lot about your lane machine as well. If your pressure gauge fluctuates as you are applying loads or your pressure seems much higher than normal, you may need to clean your oil control valve. Dirt can accumulate in your valve over time and cause pressure fluctuations while applying loads. If the valve is dirty, take a good look at your filter inside your oil tank as well (154-0212). Replacing it once a year will keep you in top running order.
Your lane machine is one of the most important machines in your center. My final example I tend to give to proprietors and mechanics alike goes something like this…….
If one of your pinsetters happens to go down during a league, you may upset at most the 10 people that are bowling on that pair. But you probably have the parts to be able to fix this later that evening. If your lane machine goes down, and you have a 32 lane center that is full, you’ve now made 160 people upset, and you may NOT have the parts to fix it. You next day air the parts, but your still down the next night, and 160 turns into 320. It is extremely important that you keep your machine clean, do your daily and monthly preventative maintenance, and not take your lane machine for granted. Always keep a few parts on hand. One of every relay, two of every fuse, a fuse holder, a head drive belt, check valves, etc.
This minimal list of low-cost items can be the difference between a full house of happy bowlers, or a lynch mob and a quick backdoor exit of the center. Spend ten minutes a day, 20 minutes once a week, an hour a month and a half day every six months on your machine, and you will be able to keep it clean, and inspect the machine for wear on a regular basis. Always remember we are only a phone call away 24 hours a day 7 days a week from anywhere in the world. We are ALWAYS here to help.
Good luck and good scoring on your new season.
Kegel’s Revolutionary Slope Graphs
With the invention of the Kegel LaneMapper™, came a greater than ever extensive study of bowling lane topography. With that study, came a stark realization that gravity randomly affects the bowling ball much more on synthetic lanes versus regularly resurfaced wood lanes.
The reason gravity and topography comes into play more today is because synthetic lanes deviate from flatness more than wood lanes ever did.
Also, although a dry synthetic lane has more friction than a wood lane (smoother surface causes a greater footprint from the bowling ball), a conditioned synthetic lane has less friction than a conditioned (oiled) wood lane, making it easier for an object to move “off line” in a non-flat situation.
For years, people in the game of bowling only talked about thousands of an inch with regard to the level specifications of a bowling lane. In short, a certified bowling lane can not deviate from +/- .040” over the width of the lane (cross-tilts), nor can any crowns (hills) or depressions (valleys) along the surface be greater than the +/- .040” specification. This specification was implemented in 1939 by the American Bowling Congress along with the Annual Resurfacing Requirement, which was made for wood lanes.
Sometime before 1964, the Annual Resurfacing Requirement became the Bi-Annual Resurfacing Requirement. But in 1964 by pressure from the for-profit bowling industry, resurfacing requirements on any time line by sanctioned bowling centers was removed by the ABC, yet the level specifications remained.
The deletion of that rule created a huge asymmetric lane wear issue, which culminated with the PBA creating their own lane maintenance division, and implementing their own lane surface policies for PBA Tour events.
But today, with the large number of synthetic lanes, we have not only asymmetric wear issues, we found bowling lanes can also have severe asymmetric level issues. For Kegel and the LaneMapper project, our next challenge was to find a way to easily show the affects gravity had on a bowling ball on any one lane at any specific distance.
The breakthrough came by creating and defining a brand new term in bowling - Slope per Board™.
Although we explained Slope Per Board in our last Inside Line article, Lou Trunk's What a Shock - Newton Correct, we can't stress enough the importance of looking at a bowling lane in this manner. Remember, the bowling ball only reacts to the board it's on, and could care less about the boards it's not on.
Once we compile all the data of a lane the Kegel LaneMapper is able to give us, cross-tilt numbers and each board’s crown or depression values, we are able to calculate the individual side slope of any one board at any point the lane is measured at.
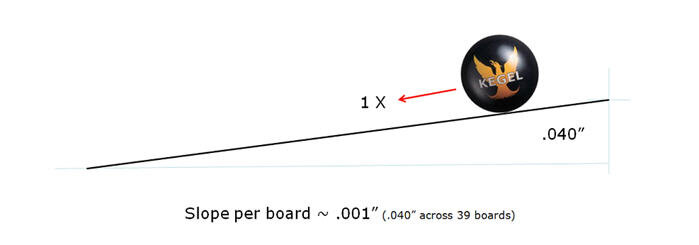
For instance, we know a bowling lane consists of 39 boards, and if a bowling lane is tilted high right 40/1000” (1 mm), which is the maximum allowable amount under the specification rules, that would give us a slope per board value of about 1/1000” (.025 mm) for each board on the lane (.040”/39=~.001”).

If we double that cross-tilt to be .080”, which is two times the allowable amount under the specification rules, that would give us a Slope per Board value of .002” for each board (.080”/39=~.002”).
Another instance that would give us that same .002” Slope per Board value, but be within current specification, would be a .040” V-Shaped depression, or crown, directly to the center of the lane. The calculation is a .040” slope over 20 boards, which equals a .002” Slope per Board as well (.040”/20=.002”).
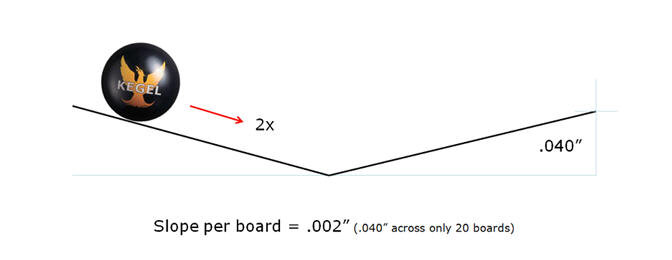
Understand, the ball doesn’t care about the lane being in specification or out of specification. The ball feels the exact same gravitational influence of .002” under each scenario – one scenario twice the allowable amount, and one perfectly within specifications.
However, as soon as we introduce crowns and depressions into the equation, that cross-tilt slope per board value can increase or decrease significantly, and depending on which way the gravitational slope is, it will influence the bowling ball to the left or to the right as it travels down and across the lane surface.

With synthetic lane installations, it is common to see crowns or depressions combined with tilts to produce Slope per Board values well over .005”, which is equal to a cross-tilt that is five times (.200”) the legal specification limit.
“The breakthrough came by creating and defining a brand new term in bowling - Slope per Board.”
The Slope Graph
Now that we realized the random deviation from levelness of a synthetic bowling lane, we began to experiment with different graphical representations of the data. After some experimentation, we settled on a seven color overhead graph, with varying shades of blue being right gravitational influence (the darker the color, the more influence), varying shades of red being left gravitational influences, and green being neutral to very little gravitational influence on the bowling ball (arrow graphic below).
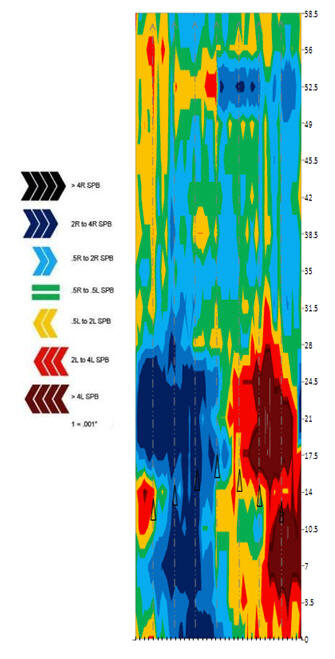
Our current LaneMap Slope Graphs (pictured left) have been scaled to be much wider than an actual bowling lane so to easily see the left-to-right definition of the lane when a pair of lanes is on one sheet of paper.
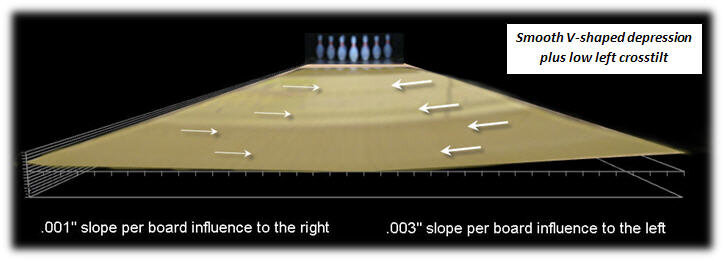
To the left is an example of a bowling lane that has some severe depressions the first 28’ of the lane; this is very common with aging synthetic lanes installed over existing wood lanes.
After the 28’ mark, the lane becomes slightly crowned. This is evident from the blue colors outside on the right side of the lane, and the red spectrum colors on the outside on the left side of the lane.
To give you an example how much those front lane depressions affect a bowling ball; if a 15 pound ball is placed on the right side 8th board at the foul line, and it is straightly rolled end-over-end at 18 mph, by the time it reaches the 28 foot mark, based upon this actual lanes levelness in that area, the ball will have moved almost 3” to the left!
After 28’, and the ball being almost to the 11th board, the forces on this lane are basically non-existent, or cancel each other out, keeping the ball near the 11th board the rest of its journey to the pins.
Remember Andy Varipapa's “double hook trick” where he spin rolls the ball at the foul line to the right side of the lane, and then it rolls to the left side of the lane, and then back to the right again to make the 10 pin? This is most likely gravity at work on a depressed lane surface - all wood lanes were cut with a depression. It’s only a trick because many assume slopes that are not visible to the naked eye will not affect a bowling ball’s path.
However, our testing has shown these "invisible slopes" can affect the path of the ball significantly. It's possible Andy also knew that, and he might have known spinning the ball would decrease the friction between the ball surface and the lane surface, helping gravity “do its thing”. After all, the Laws of Motion were around long before Andy Varipapa.
It must be noted, in accordance to the Laws of Physics, that a side slope on an oiled lane (low friction) will make a ball move off line more than on a perfectly dry lane because less force is needed to move the ball offline. Think of a car on a side hill on an icy road versus dry pavement; the same physical forces apply to bowling balls.
We have also been studying how a rotating bowling ball is affected by these different side hill slopes, and with all the varying degrees of axis rotation, axis tilt, and rev rates of different styles, along with varying amounts of friction, ball weights, and ball speeds, it is very complicated math.
But basically, the Laws of Physics still apply - a ball rotating against the slide slope will deplete energy quicker than a ball rotating with a side slope.
For example, a player like Pete Weber, who has a high degree of axis rotation on his normal delivery, will be affected more on a side hill slope perpendicular to his axis of rotation than a player like Jason Belmonte, whose axis of rotation is much less. It could be a positive or negative effect depending on which way that side slope is and how the players must attack the lanes to find the most room for error and best pin carry.
However, with Kegel's Slope Graphs none of that matters because we are comparing different lanes to one another, with all those rotational and friction properties being near the same for any particular player.
So far the Kegel Slope Graphs have been spot on in real world situations. Not only have we been watching and proving them in action at many high level events and championships over the past two years, from a thousand miles away, after fully measuring a bowling center with the Kegel LaneMapper™ and creating a Kegel LaneMap™ Report and Guide, we can tell a proprietor what lanes in their bowling center have certain characteristics, or which pairs are the highest and lowest scoring, without ever steeping foot inside their center. Every time they are amazed what we can tell them from this data.
In addition, when having these Slope Graphs compiled into a full Kegel LaneMap Report of any bowling center holding a tournament or championship, we can also predict what lane is tighter, what lane hooks more, where a lane will play the fairest, and what pair topography will be least influential, or be the fairest for most styles, and therefore, to hold the finals on.
From our formal and concourse educational seminars, we find understanding these graphs and how it relates to ball motion takes very little time. But to this day, and with all the education on oil patterns, most still don’t understand oil patterns and how they relate to ball motion,
How many times have you heard, “the oil pattern didn’t play anything like it did at home”, or “the oil pattern says we should play here, but it seems to be better over there”?
With Kegel’s LaneMapper and the reports and Slope Graphs it generates, we now know exactly why that happens.
ADDITIONAL INFORMATION
Below are links to download Kegel LaneMap Guides for a few bowling centers so we can show you real world examples on how lanes differ from one another.
The proprietors of these two centers, Werner Knoebl of Dream Bowl Palace in Munich, Germany and Ronald Dol of Dolfijn Bowling in Tilburg, The Netherlands, are very progressive and sport oriented bowling proprietors. It is their feeling that sharing this information makes for a more level playing field.
As any proprietor knows, one of the biggest challenges for the weekly bowler is trying to adjust to radically different lanes.
Kegel LaneMap Guide Downloads:
31 January 2012 - Dolfijn Bowling - Tilburg, The Netherlands: 1.3MB PDF - this report was made available to all players by the organizers of the 2012 European Bowling Tour's Hammer Bronzen Schietspoel International.
2 February 2011 - Dream Bowl Palace BEFORE the March 2011 re-leveling. After the re-leveling, lane play became very similar from lane to lane.
This example is one of the absolute best new synthetic installations we've seen: 20121015 LaneMap Report from Bowl for Fun in Langen, Germany
RELATED ARTICLES
Weather, Topography, and Ball Motion
What a Shock - Newton Correct!
Topography: What does it all mean?
What a Shock - Newton Correct!
By Lou Trunk – Professional lane installer
Two time winner of BPAA Special Projects Award
USBC National Tournament Lane Installer and/or Stand-By Service Manager since 1987
Over the past 24 months, along with the staff at Kegel, we have stepped up the topography testing of years prior by performing revolutionary experiments and gathering data from all over the world. We have been closely studying different lane shapes, creating formulas, having late night jams sessions, and watching 1000’s of bowling balls go down the lane trying to prove, and disprove, how topography affects the motion and the direction of the bowling ball as it rolls from foul line to off the end of the pin deck. Notice we didn’t write head pin. As you read the full series, you’ll come to understand why.
This series of articles may be the most important subject players, proprietors, tournament organizers and administrators of the game have ever read regarding the technical side of the modern day sport of bowling.
Newton Correct!
The “thought experiments” we, along with a very few others, have been executing in our minds for over 20 years, finally took to the lanes early November 2009 in the form of actual measured real life situations of lane topography, on which actual real life bowlers of various styles threw shots, which produced observable and CATS™ measured ball reactions.
The initial tests were exciting and invigorating to John Davis, Bill Mongeau, Ted Thompson and me, but probably not so shocking to Sir Isaac. Indeed, it appears that Newton’s First and Second Laws in fact apply to the game of Bowling.
In layman’s terms, these experiments involve three basics:
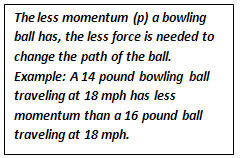
1. Momentum, (and the law of conservation of momentum): a body’s momentum equals it’s mass times it’s velocity p=mv (p is the symbol for Momentum).
2. Newton’s First Law of Motion, which states in the absence of force, a moving body will move in a straight line at constant speed.
3. Newton’s Second Law of Motion, which states when a force is applied to a body,acceleration will result in the direction of the force.
Most important with regard to Newton’s Second Law for our experiments, is that the net force on an object is equal to the time rate of change of its linear momentum.
For example, the more momentum a ball has, the more force will be needed to act upon the ball, in order to change the ball’s path by a certain distance.
In bowling, the gravitational force on a bowling ball comes from a lane’s tilts, depressions and crowns. And mind you, there is not a perfectly flat lane anywhere on this planet.
Most everyone in the bowling industry considers the lane surface as a two dimensional surface. A flat plane, or an X and Y axis, with the X axis being the width of a lane, and the Y axis being the length of a lane. If the lane was merely two dimensional, gravity would simply be a constant throughout any bowling ball’s journey down any lane. That is simply never the case, and the often unconsidered Z axis – the change in elevation – has a significant amount of influence on ball motion.
For our experiments we considered the force, momentum and inertia situations. The constants on repeated shots were mass (ball weight), lane surface, gravity, oil type and oil pattern; which combine to produce a certain ball path shape for a certain bowler with a certain ball on a flat surface. Then we changed only the topography, and that’s where the “shock” began. And it was shocking to us, but not to Sir Isaac Newton.
Slope per Board is the Key!
The first thing we must explain is the creation of a brand new term in bowling called, Slope per Board. With the invention of the Kegel Lane Mapper, by taking crown and depression readings of each and every board across the lane, and then adding the single crosstilt reading to each board, we can calculate the slope of each board at any distance on the bowling lane.
To fully understand the significance of this reading, we must understand that as the bowling ball travels down the lane from foul line to pin deck, it simply reacts to whatever gravitational force is acting on the ball on whatever specific board it is on at any one moment in time, and it doesn’t care about the slope of surrounding boards.
For instance, we know a bowling lane consists of 39 boards, and if a bowling lane is tilted high right 40/1000” (1 mm), which is the maximum allowable amount under the specification rules, that would give us a slope per board value of about 1/1000” (.025 mm) for each board on the lane.
If we double that crosstilt to be 80/1000” (2 mm), which is two times the allowable amount under the specification rules, that would give us a slope per board value of 2/1000” (.050 mm) for each board.
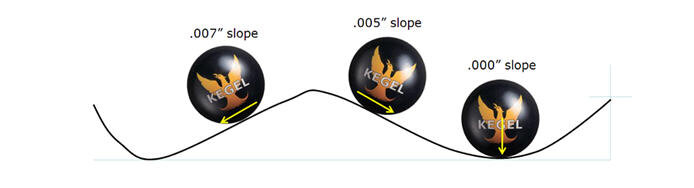
Another instance that would give us that same 2/1000" slope per board value, but be within current specification, would be a 40/1000” v-shaped crown or depression directly to the center of the lane (.040” slope/20 boards = .002” slope/board.)

The ball doesn’t care about the specification. It feels the exact same gravitational influence of .002” under each scenario – one scenario twice the allowable amount, and one perfectly within specification.
Further, as soon as we introduce crowns and depressions into the equation, that crosstilt slope per board value can increase significantly, or even decrease, and depending on which way the gravitational slope is, it will influence the bowling ball to the left or to the right as it travels down and across the lane surface.
What did we do?
We, so far had introduced a “force” to the ball, a Gravitational Force. We shaped a few of the adjustable Kegel Training Center lanes with consistent gravitational shapes relative to the lane, yet contradicting gravitational forces relative to the ball’s inertial path.
On one pair of lanes, we created as near a non-imbalanced gravitational force as we could, as flat as possible. This gives us a benchmark ball motion reaction where there is constant gravitational force on the bowling ball as it rolls down the lane.
On another pair, we created two opposite shapes.
One lane had a legal gravitational imbalance of approximately .003” slope per board (SPB) low left for a right-hander playing anywhere from 1-20 board. We did this by creating a .040” low left crosstilt (.001”SPB), plus a .040” smooth V-shaped depression from both 1 boards to the 20 board (.002” SPB) which gives us that .003” per board slope effect toward the center of the lane for a right-handed player.
On this lane’s mate, we created the low right equivalent. We did this by reversing what we did on the companion lane.
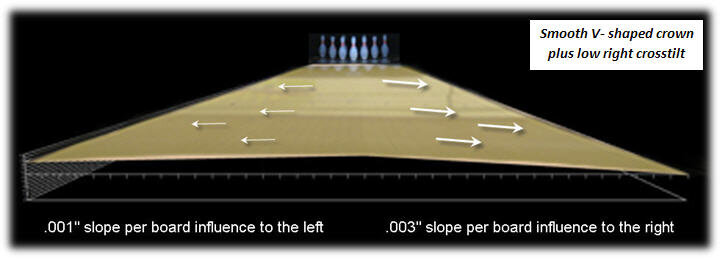
It is important to note that this very shape yields only a .001” slope for a left-hander playing anywhere from boards 1-20 on his side, since the combination of the tilt and the crown/depression compound the slope for the right-hander but are partially counterbalancing for the left-hander.
And finally, just like the pictures above, we created two lanes with real world situations of a net gravitational imbalance of approximately .005” slope per board. One lane with a gravitational force towards the center of the lane, and the other gravitational force towards the right gutter for a right-handed player, which was again opposite but nearly flat for the left-hander because of the counter-balancing combination of the crosstilt plus the crown and depression.
What did we see?
Newton would be proud. The left-handers had all pairs about the same. The right-handers certainly did not. The relative effect on the bowling ball was proportional in three ways. First, there was nearly double the effect on a ball’s path at .005” slope per board as there was at .003” slope per board in the direction of the slope.
Secondly, the effect was proportionally less for higher ball speeds and greater for slower ball speeds. The faster the ball was thrown, the less boards the ball missed the intended breakpoint because of the gravitational effects of the lane topography.
Remember that the displacement caused by a gravitational influence is a function of the time spent on the influence, so it stands to reason: faster speed = less time on the influence = less displacement.
Sure enough, the differences in the two opposite gravity force lanes were proportionally greater for slower ball speed players. And third, lighter weight balls were proportionally more effected by a certain slope.
“Displacement caused by a gravitational influence is a function of the time spent on the influence.”
So at this point, what we had tested so far, were bowling lanes with a consistent gravitational force, either inward or outward, and bowlers of various speeds and ball weights relative to themselves – comparing a bowler’s data to his own data on the various shapes. Then we gathered data comparing bowlers to other bowlers. Bowler A playing straight up the 5 board and Bowler B playing 20 to a break point of 5.
For Bowler A, where the ball hit the pins was greatly different since his ball’s translation was almost continuously at a 90 degree angle to the gravitational force vector. The net change in impact position was greatest with this style on these opposite lane shapes.
Bowler B’s net change in impact position was not as significantly different as Bowler A’s, because Bowler B had the gravitational force displacing his ball at a slightly more obtuse angle (an angle greater than 90° and less than 180°).
The results for the two launch angles are very different and very significant.
It would appear that the nightmare pair for the down-and-in type player is one lane tilted left all the way and one lane tilted right all the way, because his ball is continuously influenced near perpendicular to his ball’s path throughout its travel from foul line to pins, so the impact point change is huge. As much as hitting the pocket on one lane and hitting only the 3 off the right (6-9-10 pins) on the other.
The boomer’s ball (Bowler B) had less perpendicular gravitational effects on its way down the lane both to and from the breakpoint in this all left slope or all right slope situation. The impact point doesn’t change as much as Bowler A, but the hitting power and shape of the ball path does.
Bowler B’s ball path shape was more of a curve on the all left slope covering far less boards. It was easier to control the shot, and it was less speed sensitive, but incurred a lower percentage pocket carry. On the all right slope Bowler B’s ball path shape was more of a skid-snap type reaction covering more boards but with less control. The ball was also more speed sensitive however it had a higher pocket carry percentage.
Newton would certainly agree, that to be fair to all players, all ball weights, all speeds, and all launch angles, FLAT is the only fair situation, and the further we deviate from flat, the more unfair the game becomes.
Lighter bowling balls and slower ball speeds are influenced more in non-flat situations than heavier bowling balls and faster ball speeds.
Further, the gravitational effects of depressions, crowns and tilts have widely varied effects on varied launch angles. The more a bowling lane strays away from flatness, the more those gravitational effects influence different styles of play in different ways.
So now it’s time to continue our testing by redoing each test over and over. The story continues.
Newton…what a guy.
Fine Tuning your House League Pattern
This is the time of year when new seasons have begun and pattern decisions are being put to the test. You’ve made your choice, laid out the pattern, and now things aren’t going exactly as planned. You’ve verified that your machine is in perfect working order, now what do you do?
Once the bowlers take to the lane, lots of problems can come to light. If a majority of your bowlers are experiencing the same problem, it may be time to make adjustments to the pattern. Common complaints could be: too much carrydown, back ends too strong, not enough hold area, heads hooking, no swing, track dries up too quickly, or no taper. How do you trouble-shoot your pattern and fine-tune it to get the ideal conditions for this year’s league? Here are some tips for common problems with patterns which should help you make proper adjustments.
Too Much Carrydown
Too much conditioner at the end of the pattern can cause excessive carrydown. This can be rectified by not loading as far down lane on the forward pass or increasing the machines buff out speed, which decreases the amount of conditioner on the lane towards the end of the pattern.
If your machine has our reverse brush drop feature, this is another fine tune adjustment you can make to bring the amount of conditioner farther back towards the foul line, or limit the amount of conditioner towards the end of the pattern. Poor cleaning can also cause carrydown issues. This can come from an incorrect mixture of cleaner or improper machine performance. It can never hurt to double check to make sure your machine is cleaning properly. To do this, perform a clean-only run on a few lanes and see if all the conditioner and cleaner are removed from each lane.
Back Ends Are Too Strong
Lengthen the pattern or create more taper to tone down the back end reaction. Tamer back ends provide predictable ball reaction and make spare shooting much easier.
Different types of cleaner provide different back end motions; this is another “condition” adjustment you can try. You could also experiment with a weaker ratio of cleaner to water mixture, but be careful; there is a fine line between getting the lane clean, and not clean enough.
Not Enough Hold Area
Make no mistake about it, as much as bowlers think they like swing area, what creates the highest scoring environment is hold area. The hold area is created by the amount of shape in the pattern towards the end as well as some friction outside of target. Without both, it is just about impossible to have the other.
If your lane machine has reverse oiling capabilities, starting the reverse oil loads farther down the lane will help increase hold without fear of getting too much conditioner at the end of the pattern, which as we said before, can cause carrydown issues.
Lane topography can increase hold area, a side slope away from the pocket at the break point area for instance, but topography can also minimize hold area if the side slope is towards the pocket at the break point area. Before you start searching for hold area by way of the oil pattern, get to know your lanes to make sure your lanes will allow the type of shot you are searching for.
Heads are “Hooking”
The amount of oil in the lay down area, or a lane surface in poor condition, can cause the heads to hook. In both instances, the lane machine should run slower in the heads, 10 or 14 inches per second on Kegel machines. The slower the machine travels, the more brush strokes per distance traveled which increases the amount of conditioner to any one area. This is better controlled on the return oil due to the direction of travel and the rotation of the buffer brush. Apply oil loads during the return travel that finish closer to the foul line (but not less than 4 feet).
Another thing that will give the perception that the heads are hooking is when the lay-down point of the bowling ball is on the upslope of severely depressed heads. No amount of oil in the world can fight a significant gravity influence towards the headpin in this situation.
No Swing Area
The amount of oil on the outside boards or adverse lane topography can affect swing area. Reducing the length of your oil pattern, or decreasing the amount of the applied oil on the outside boards, will increase the amount of swing area. But be cautious, even though bowlers like to swing the ball, your lanes just may not allow that to happen with the success you, and they, are looking for. Just know, however, our highest scoring patterns are the ones where most styles can go up the lane and have hold area.
A recent example is the 2011 WTBA Women's World Championship where many scoring records were set on the 47' Paris oil pattern. Note: the 2011 version of the Paris pattern tapes out at 4.2:1 at 22', so be aware if you try and use this in your Sport Bowling league.
Another example of a high scoring pattern is our Kegel Navigation Challenge pattern Route 66. This 45’ pattern routinely outscores many higher ratio shorter recreation patterns.
If you have topography issues, or side slopes that go towards the outside portion of the lane, the pattern should be adjusted by stacking up your inside oil line, applying conditioner farther towards the end on the forward and reverse passes, and allow the bowlers to play a more direct line to the pocket. This should create more area where ball reaction is concerned on a longer pattern.
Another topographic issue that can decrease swing area is depressed heads. Depressed heads cause the ball to quickly lose energy which makes down lane recovery (swing area) very difficult no matter how little oil you apply to the outside boards, or how much you apply to the heads.
Track Area Dries Up Too Quickly
Many bowling centers do not apply enough oil to the mid-lane track area on both the forward and return passes. Applying oil to the track on the return pass can help provide more longevity and stability without drastically affecting the forward oil readings and ball motion at the end of the oil pattern. Another adjustment is widening your pattern slightly. As balls hook more, the track area is becoming wider and farther down-lane. Take your middle loads and try widening them out a board or two and see if this adjustment gives you more longevity to your track area.
No Taper to My Pattern
The easiest way to create taper in the pattern is to make adjustments to your lane machine’s drive speeds during the forward pass only. Increasing the drive speeds on your forward run towards the end of the pattern will apply less oil in that area which increases front to back taper.
If your machine has Kegel's reverse brush drop capability, dropping the buffer brush farther back into the pattern on the reverse pass can also give you more front to back taper within your pattern.
Conclusion
With these tips, tricks, and troubleshooting techniques, you should be able to tweak your pattern and make it playable for most of your league bowlers. However, even with excellent lane conditions, you may still not be able to please everyone. If you reach the point where the majority of the bowlers are happy and bowling well, then it may be time to leave the lanes alone.
As always, it is important to remember that the pattern is not the only factor contributing to your lane conditions. You are competing against the lane topography, the other bowlers who share the lane, and Mother Nature herself. With topography, we cannot stress enough how important it is for you to know the shape of your lanes. When that information is known, finding that right oil pattern for your center is much easier. Without it, it's just a trial and error exercise.
Bowling is about skills and technique, but it is also about versatility and one’s ability to read the lanes and make adjustments to account for those factors which are out of your control.
Warning: Managing lane conditions may result in the loss of sanity. If it occurs, please contact our free Kegel Tech Support at (800) 280-2695 and we’ll help you get it back.